> ## Documentation Index
> Fetch the complete documentation index at: https://we0-f8eb3f1a.mintlify.site/llms.txt
> Use this file to discover all available pages before exploring further.
# Website Editing & Content Optimization
> A detailed guide to refining your website using canvas editing, section editing, magic brush, and preview-stage tools.
After the first version of your website is generated, what really determines its completeness
isn't "whether it was generated" — it's "whether you continue polishing the content and details"
* Canvas Stage: Best for adjusting structure, copy, images, and page details
* Preview Stage: Best for refining, expanding, and checking the website from a near-final perspective
***
### **A. Canvas Stage**
The canvas stage is the primary phase where you work with AI to polish your pages.\
Focus on page structure, core copy, image assets, and mobile responsiveness during this stage.
#### **1. Dialog Editing (Click "Modify Design" in canvas)**
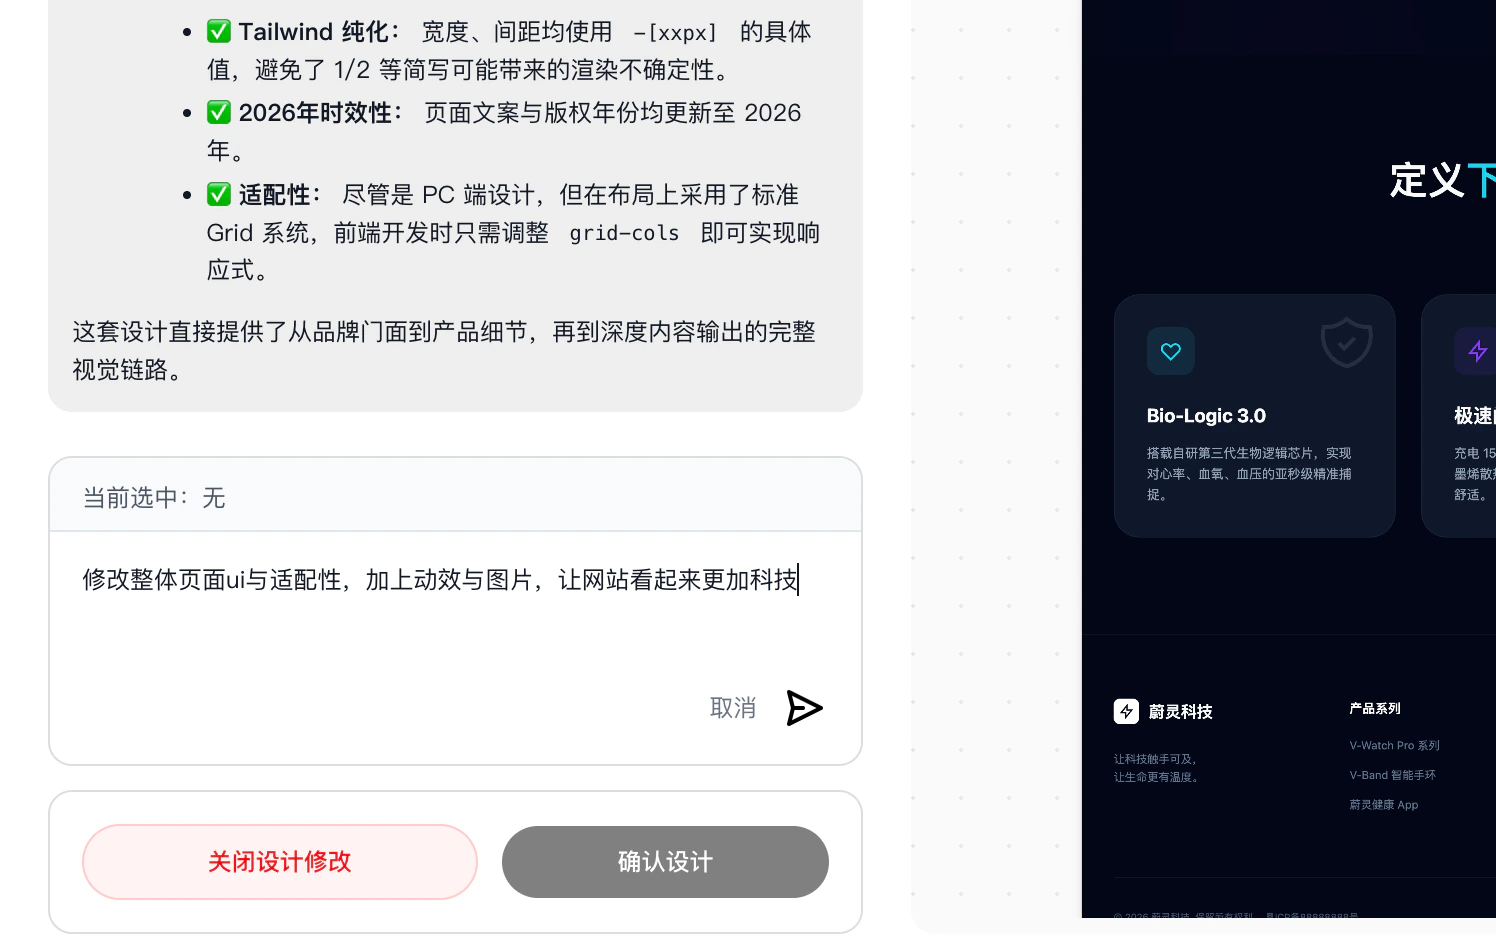
Dialog editing is best for full-page direction changes or cross-section requirements. Tell the AI what you want to change, and it will adjust the page based on your description.
Best used for:
* Changing overall style (e.g., cleaner, more techy)
* Adding or removing page modules
* Adjusting page content structure
* Unifying copy tone
* Adding page descriptions, selling points, or conversion entry points
Describe like this (more precise = better results):
* Make the homepage cleaner, reduce text stacking, and highlight the main brand visual
* Add a customer case study module to the homepage with a consultation button
* Rewrite this website to be more suitable for overseas audiences
For more accurate changes, include both "what to change" and "what to change it to" in a single sentence.
 ***
#### **2. Section Editing (Click section numbers in canvas)**
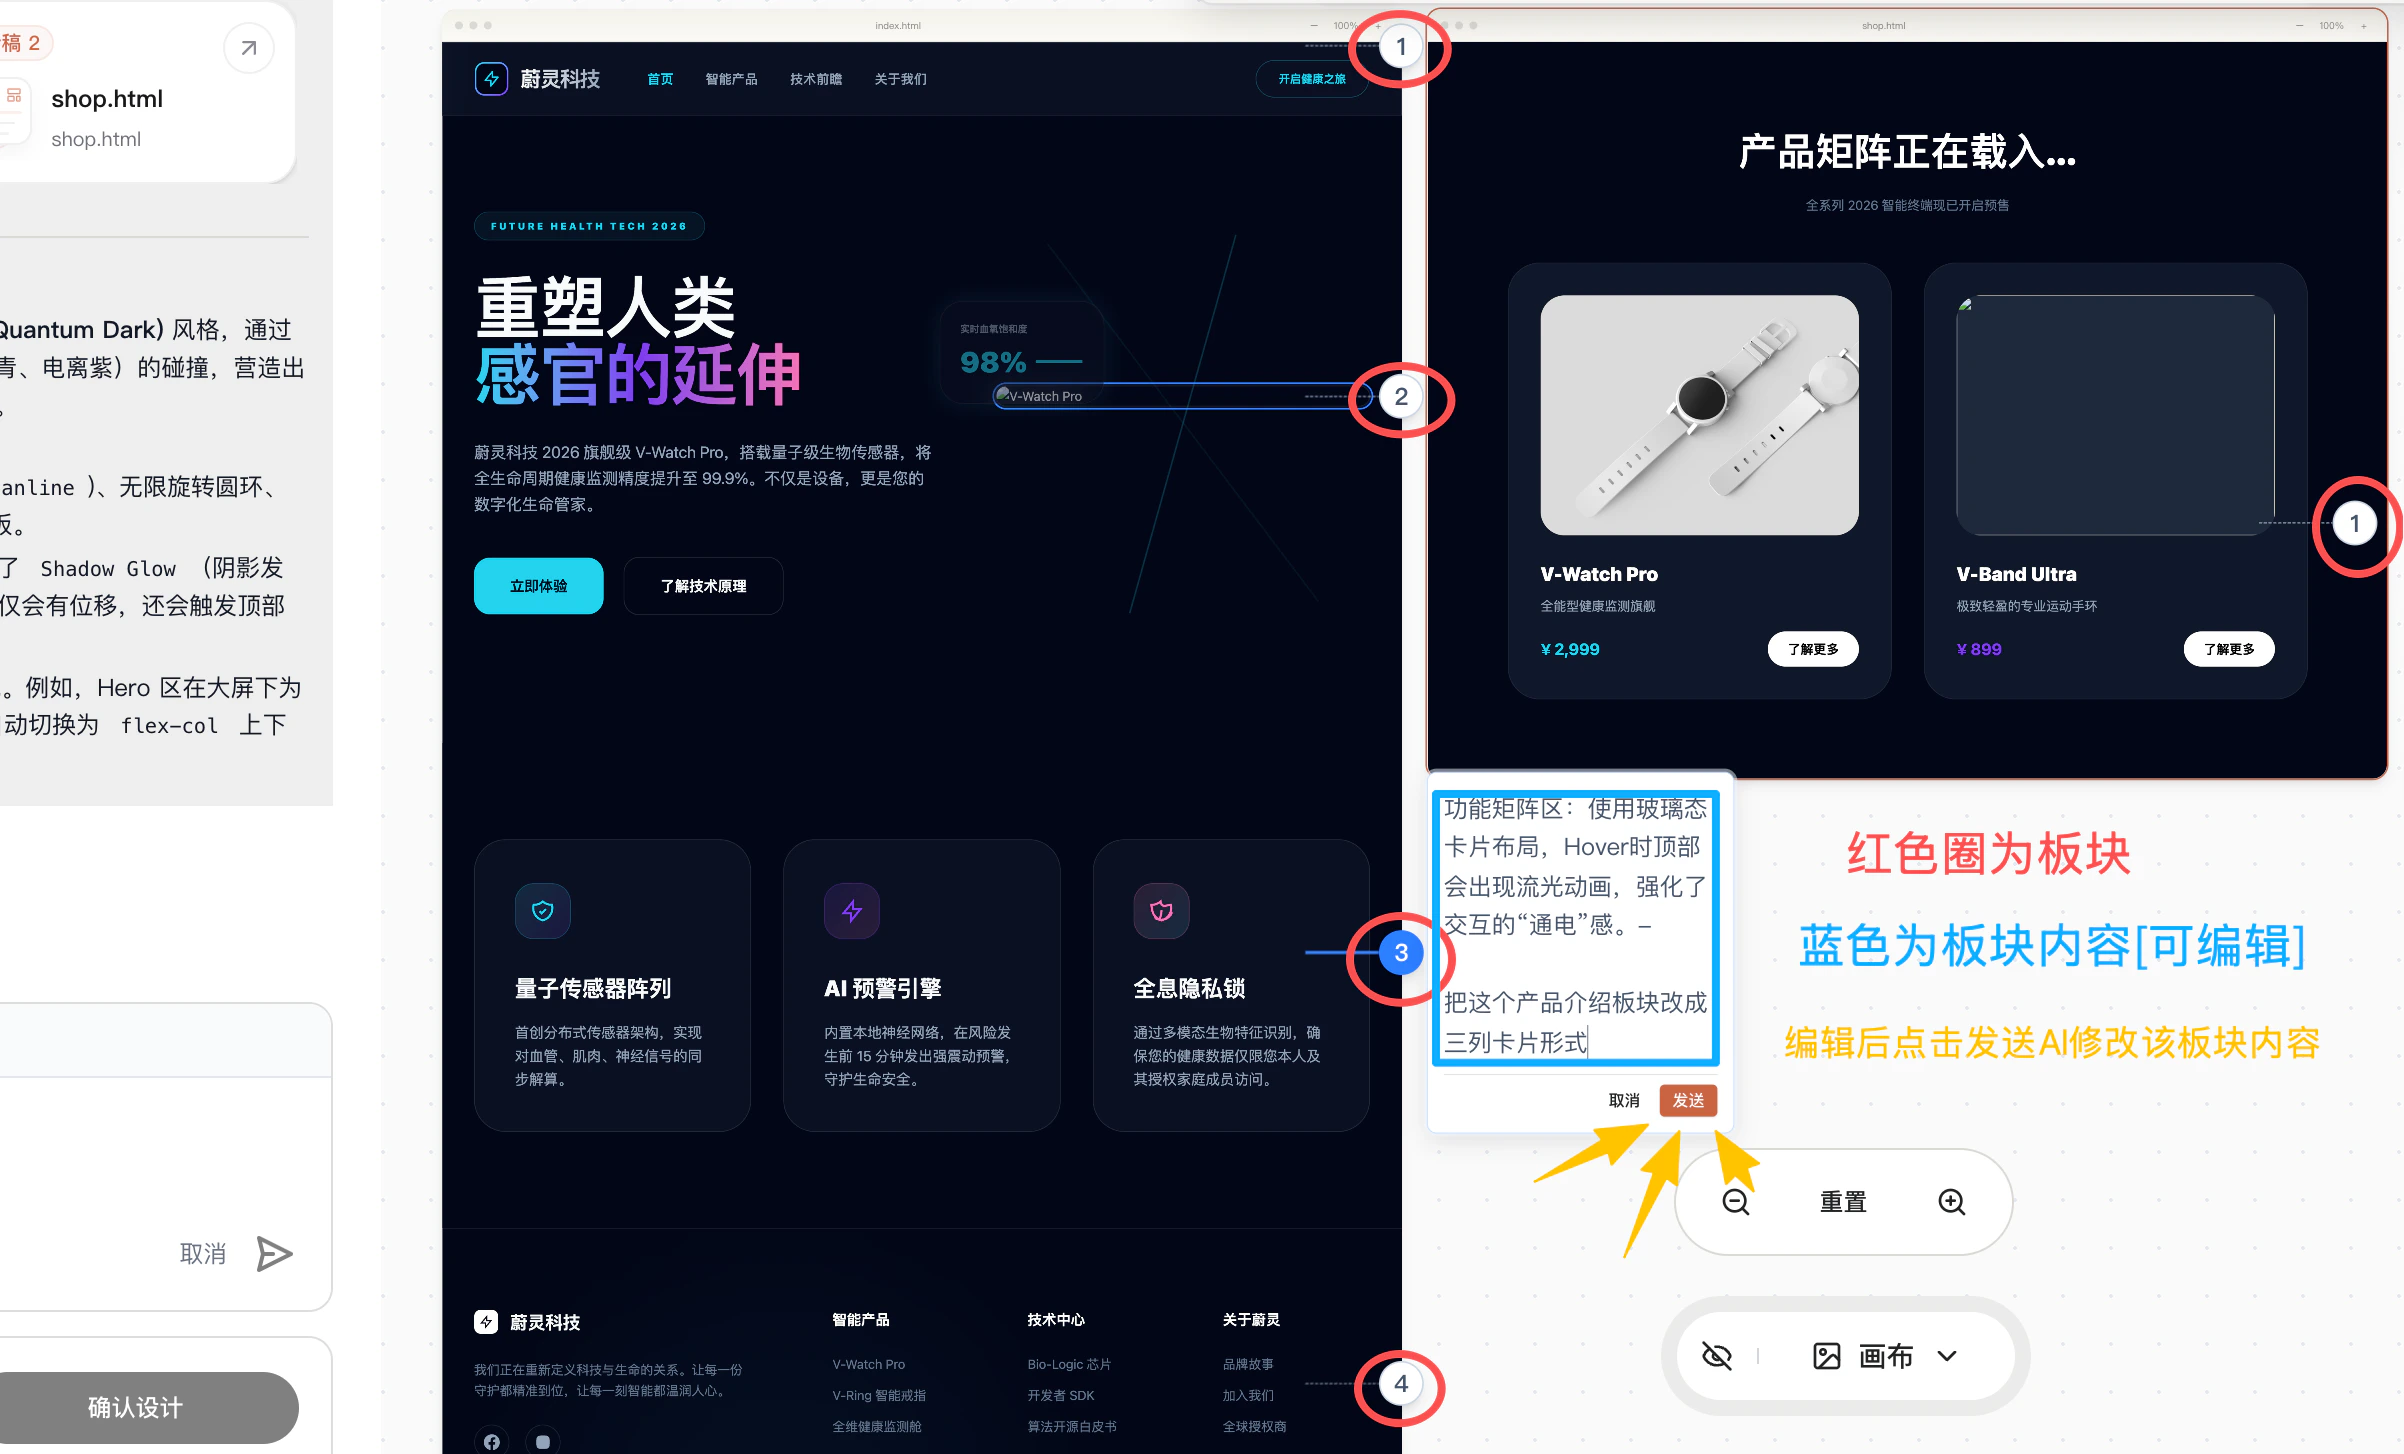
When you know exactly which area to adjust, section editing is more efficient than full-page dialog.\
You can make modification requests for a specific module.
Common sections include (automatically matched to your generated pages):
* Banner area
* Product introduction section
* Service process section
* Case study showcase
* Contact us section
* Footer information
Examples:
* Change this product intro section to a three-column card layout
* Make the case study section title more persuasive
* Remove this duplicate content and replace it with customer benefit descriptions
This method works best when you've confirmed the overall page direction and just want to optimize specific areas.
***
#### **2. Section Editing (Click section numbers in canvas)**
When you know exactly which area to adjust, section editing is more efficient than full-page dialog.\
You can make modification requests for a specific module.
Common sections include (automatically matched to your generated pages):
* Banner area
* Product introduction section
* Service process section
* Case study showcase
* Contact us section
* Footer information
Examples:
* Change this product intro section to a three-column card layout
* Make the case study section title more persuasive
* Remove this duplicate content and replace it with customer benefit descriptions
This method works best when you've confirmed the overall page direction and just want to optimize specific areas.
 ***
#### **3. Box-Select Editing (Click the selection button in the top-left corner of canvas)**
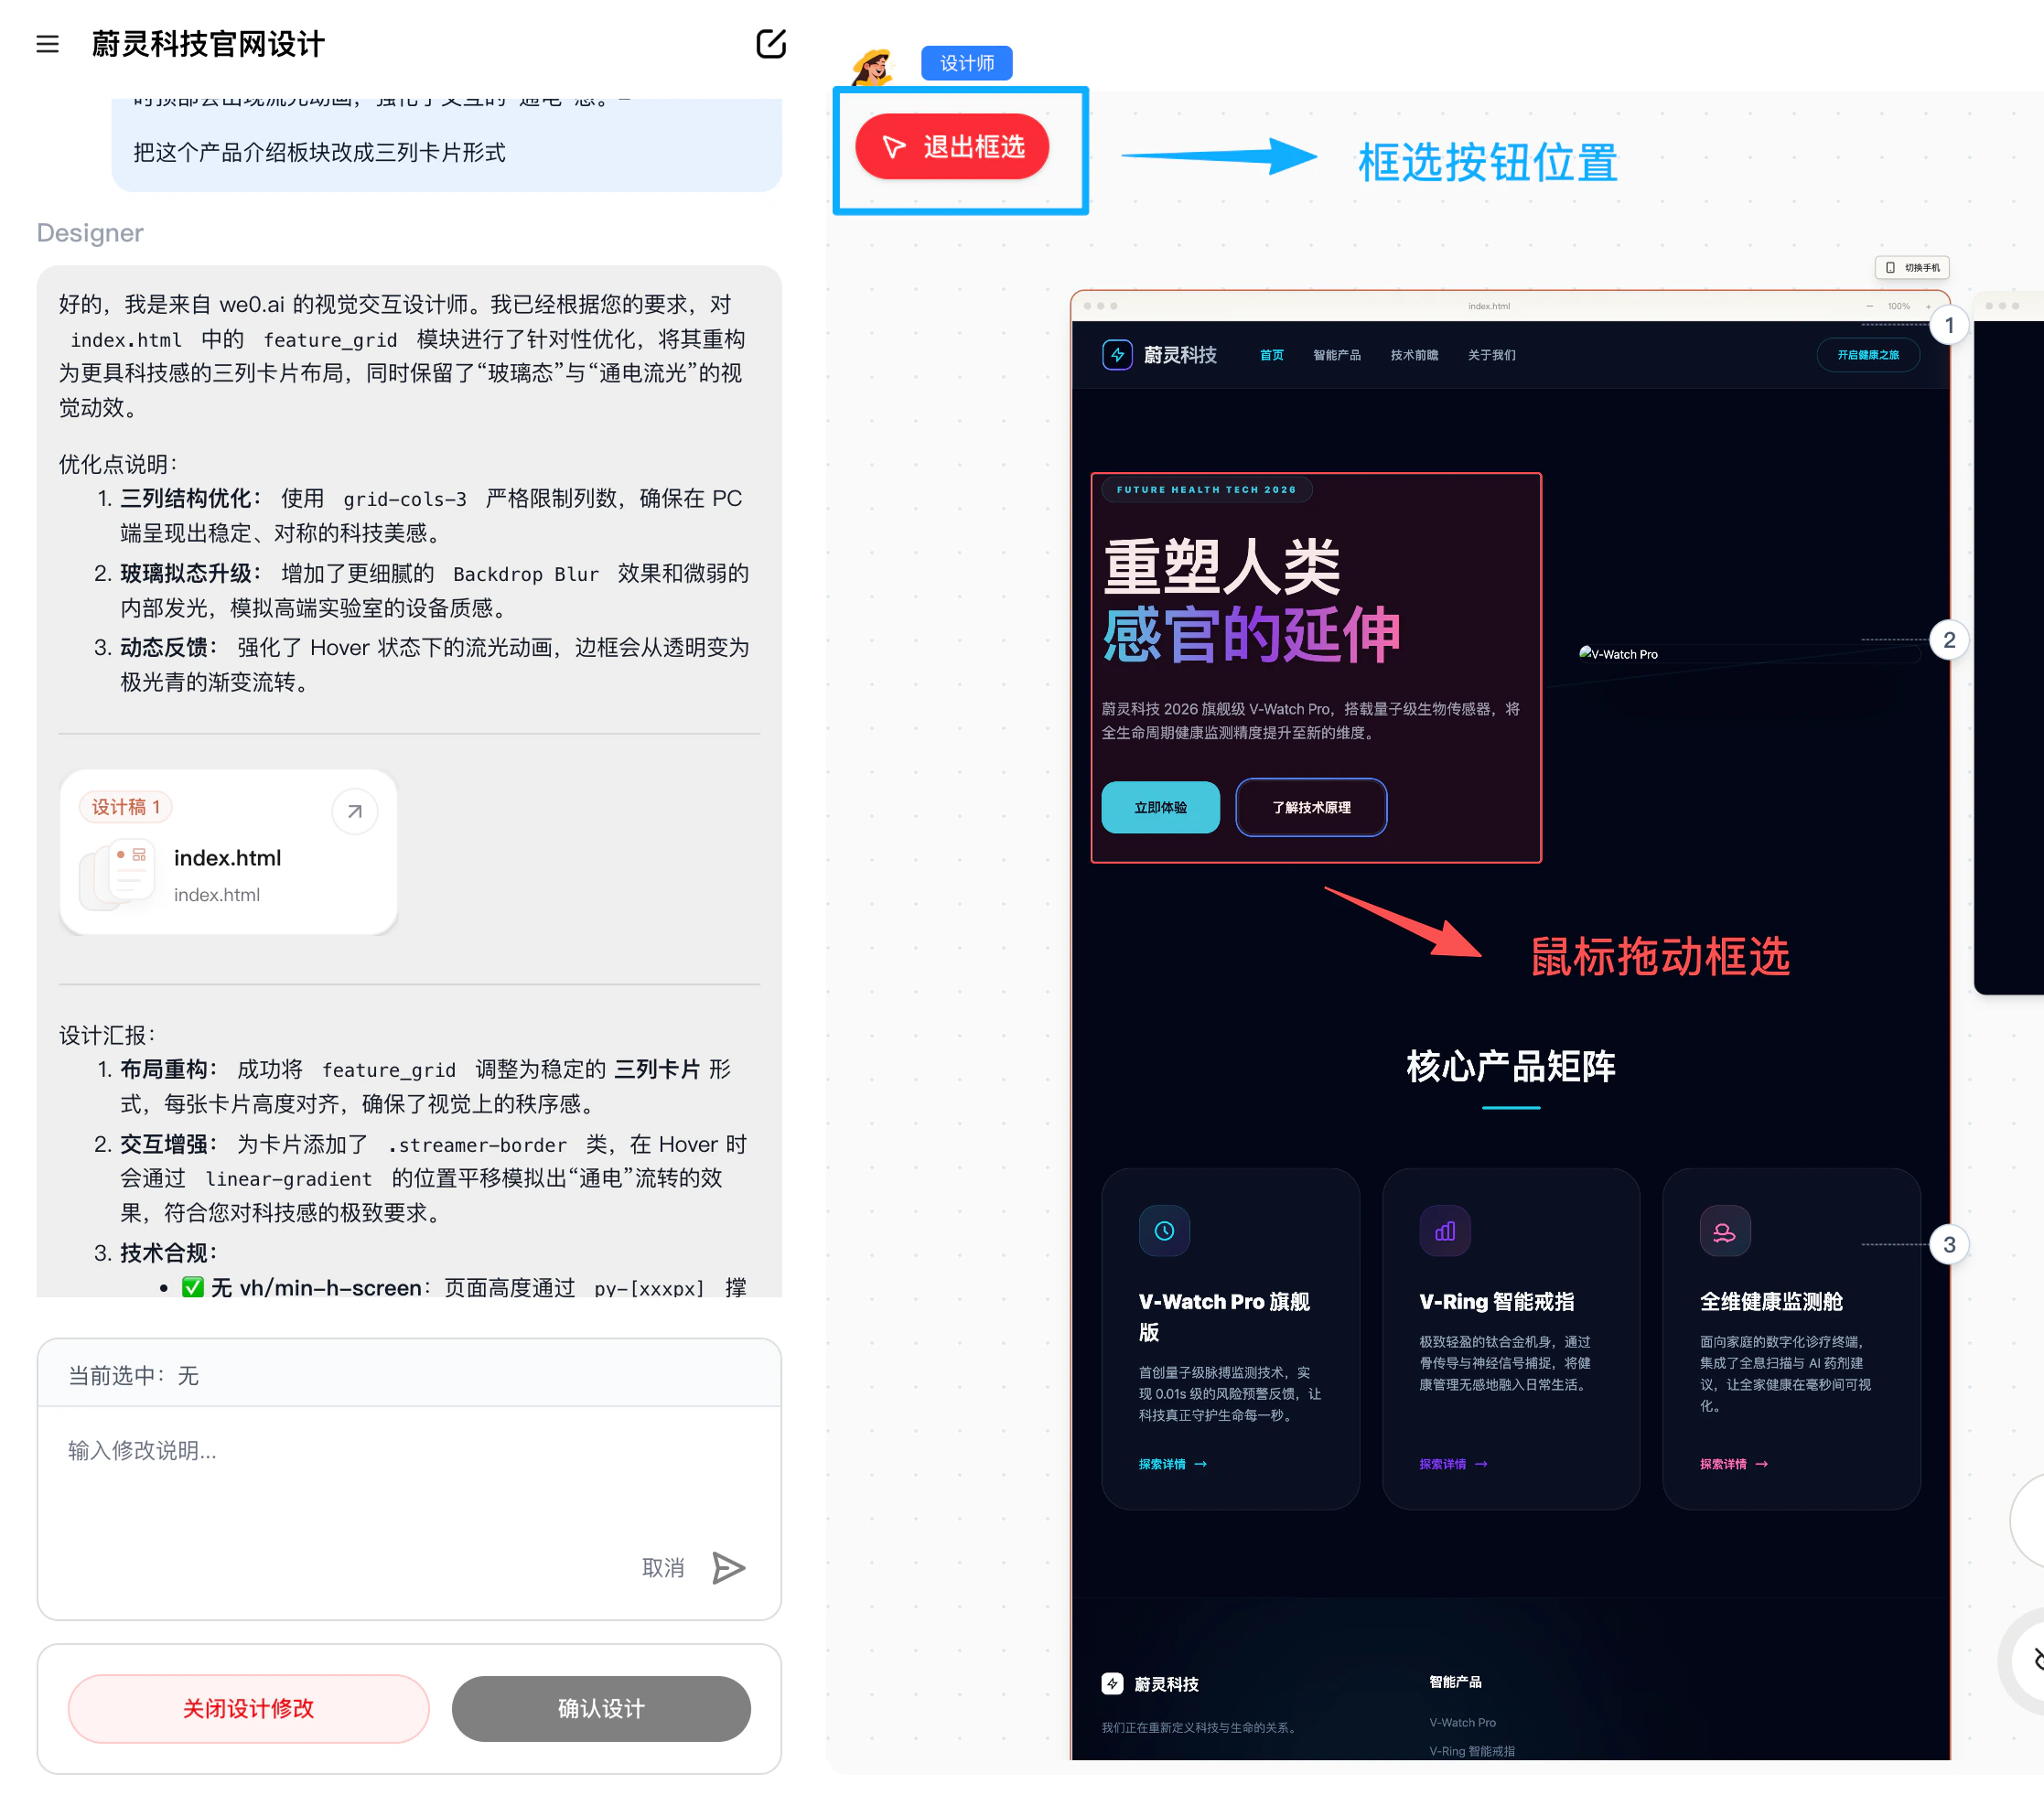
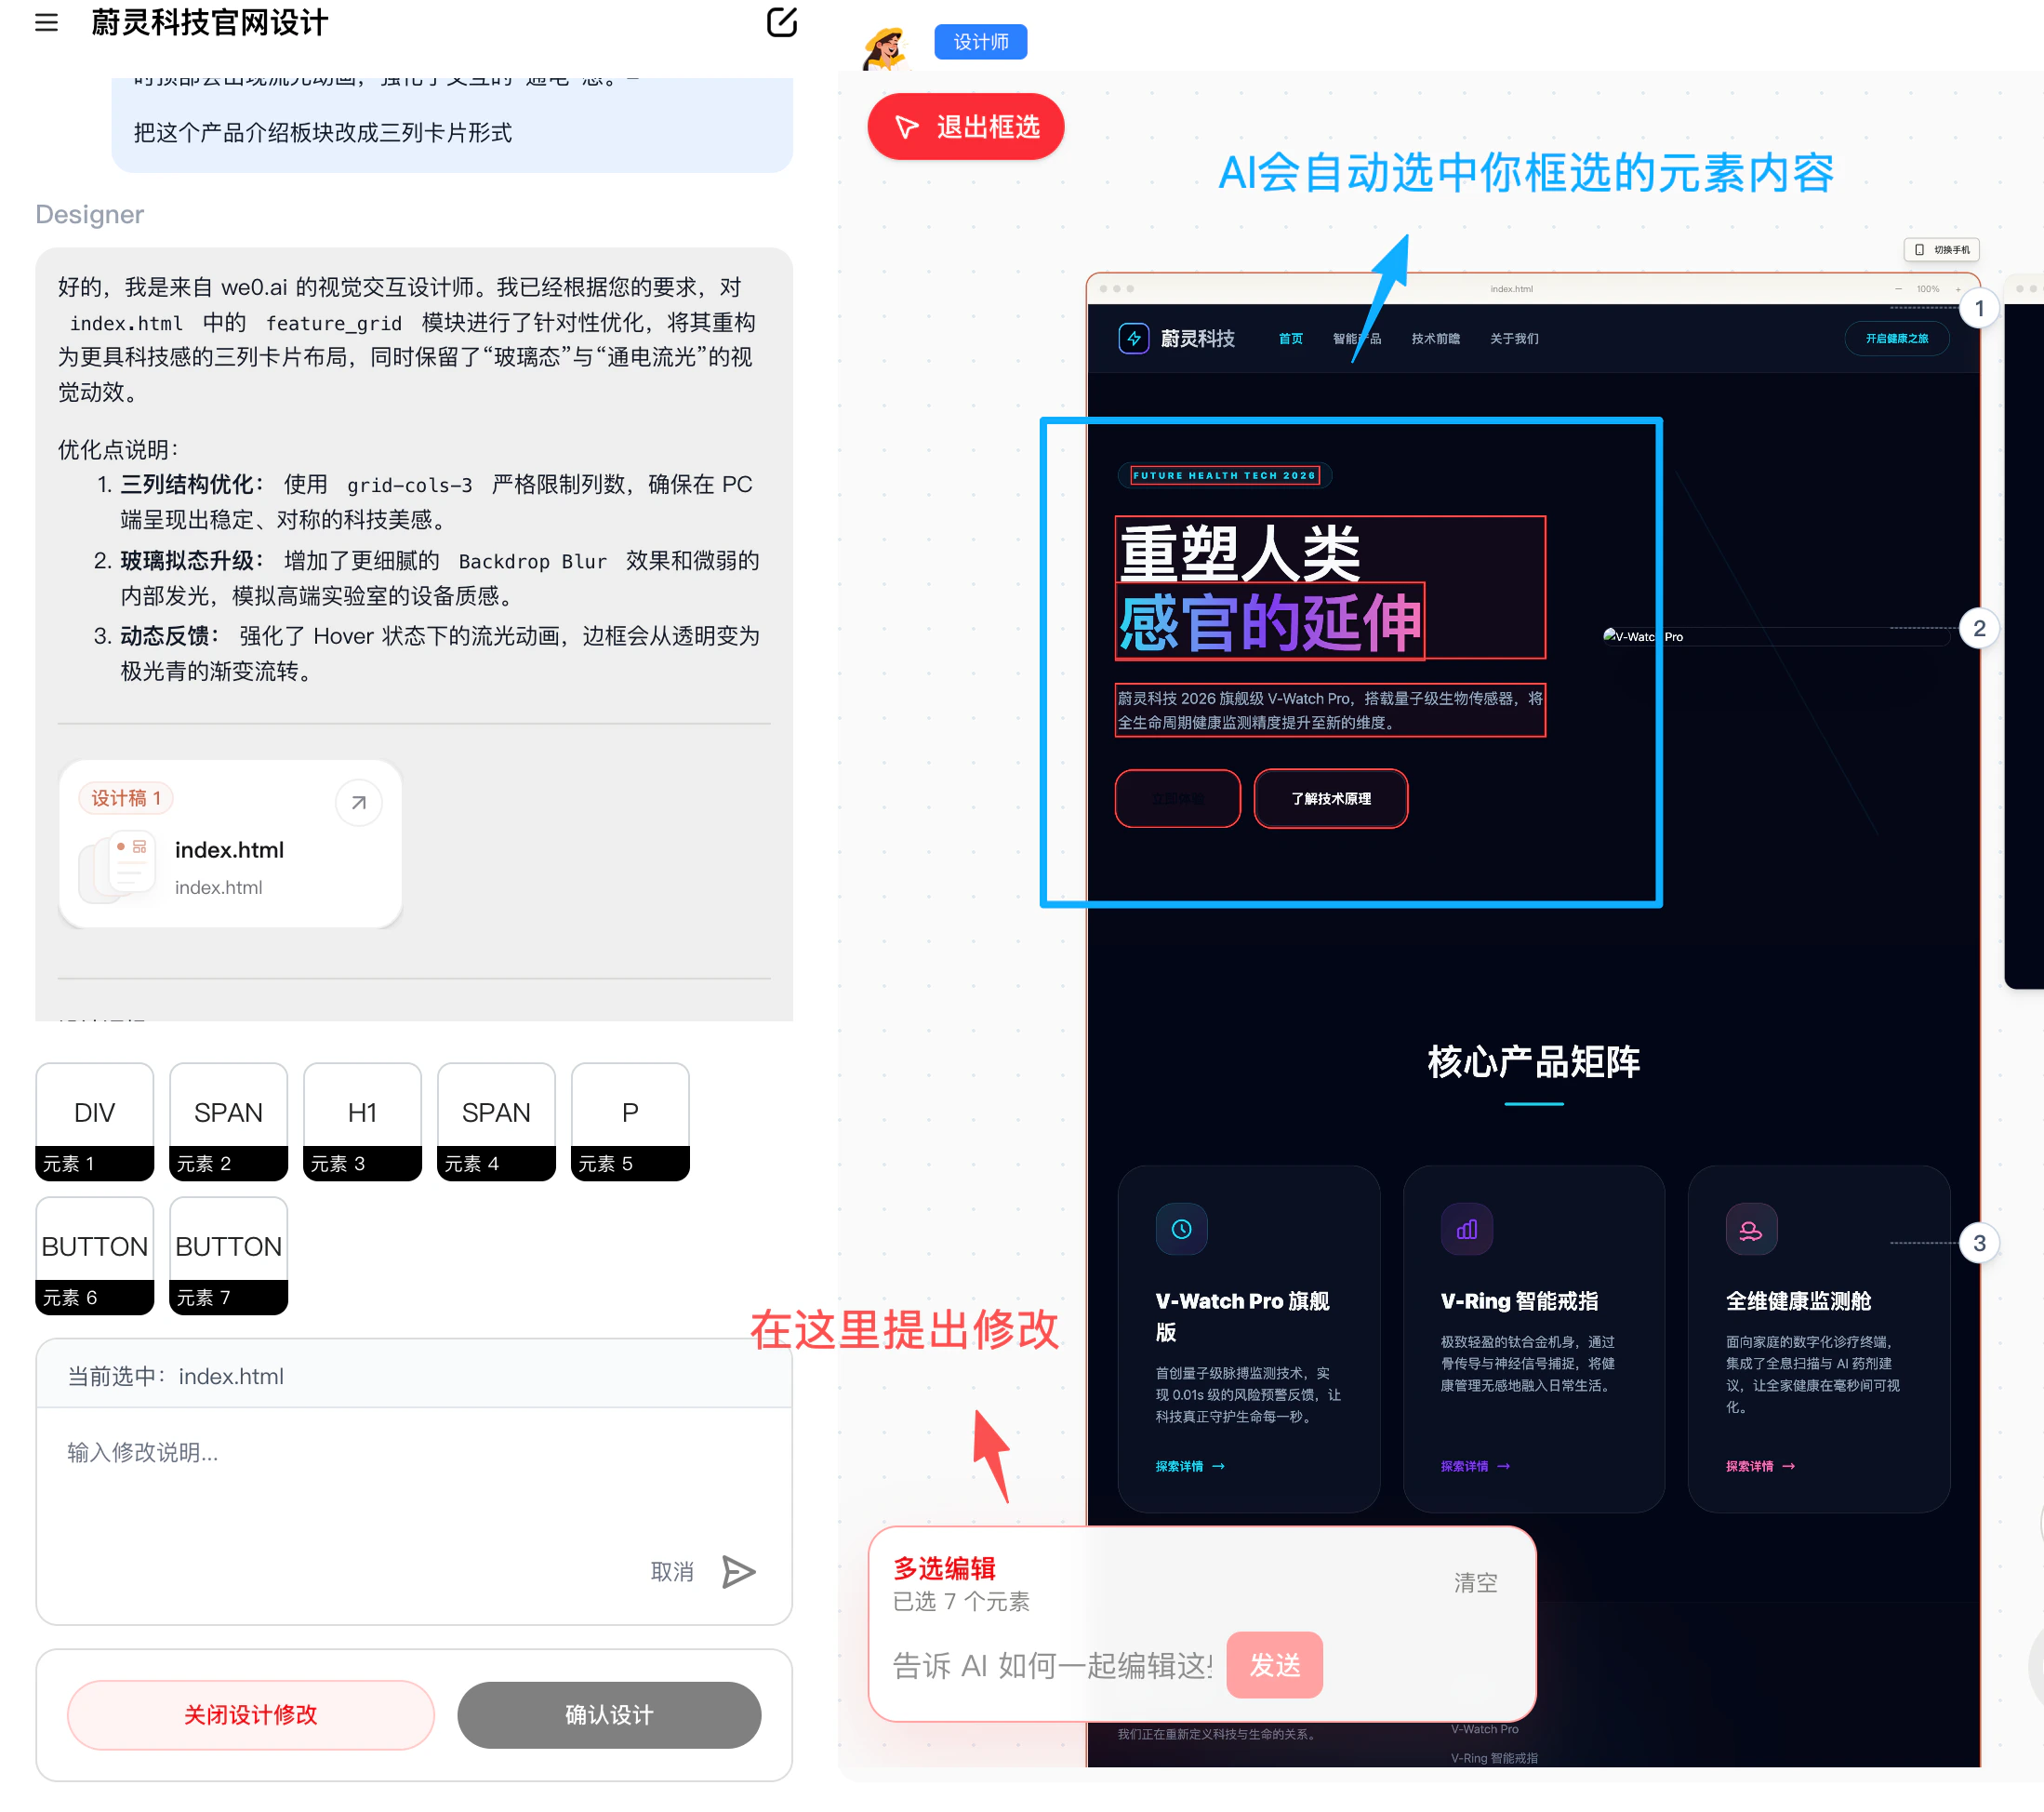
Box-select editing is best for handling multiple items within a local area. For example, if a section contains a title, image, button, and description text, you can select the entire block and tell the AI to adjust everything at once.
Best suited for:
* Adjusting an entire content block at once
* Re-laying out a specific area
* Unifying style or information hierarchy within a region
* Having the AI reorganize a block of content
Examples:
* Select this block and change it to a better converting hero section
* Select this group of content and make the layout more compact
* Select this area, keep the core information, and simplify the rest
If you feel "the problem is in this area, but you can't pinpoint exactly which line," box-select editing is usually very helpful.
***
#### **3. Box-Select Editing (Click the selection button in the top-left corner of canvas)**
Box-select editing is best for handling multiple items within a local area. For example, if a section contains a title, image, button, and description text, you can select the entire block and tell the AI to adjust everything at once.
Best suited for:
* Adjusting an entire content block at once
* Re-laying out a specific area
* Unifying style or information hierarchy within a region
* Having the AI reorganize a block of content
Examples:
* Select this block and change it to a better converting hero section
* Select this group of content and make the layout more compact
* Select this area, keep the core information, and simplify the rest
If you feel "the problem is in this area, but you can't pinpoint exactly which line," box-select editing is usually very helpful.
 ***
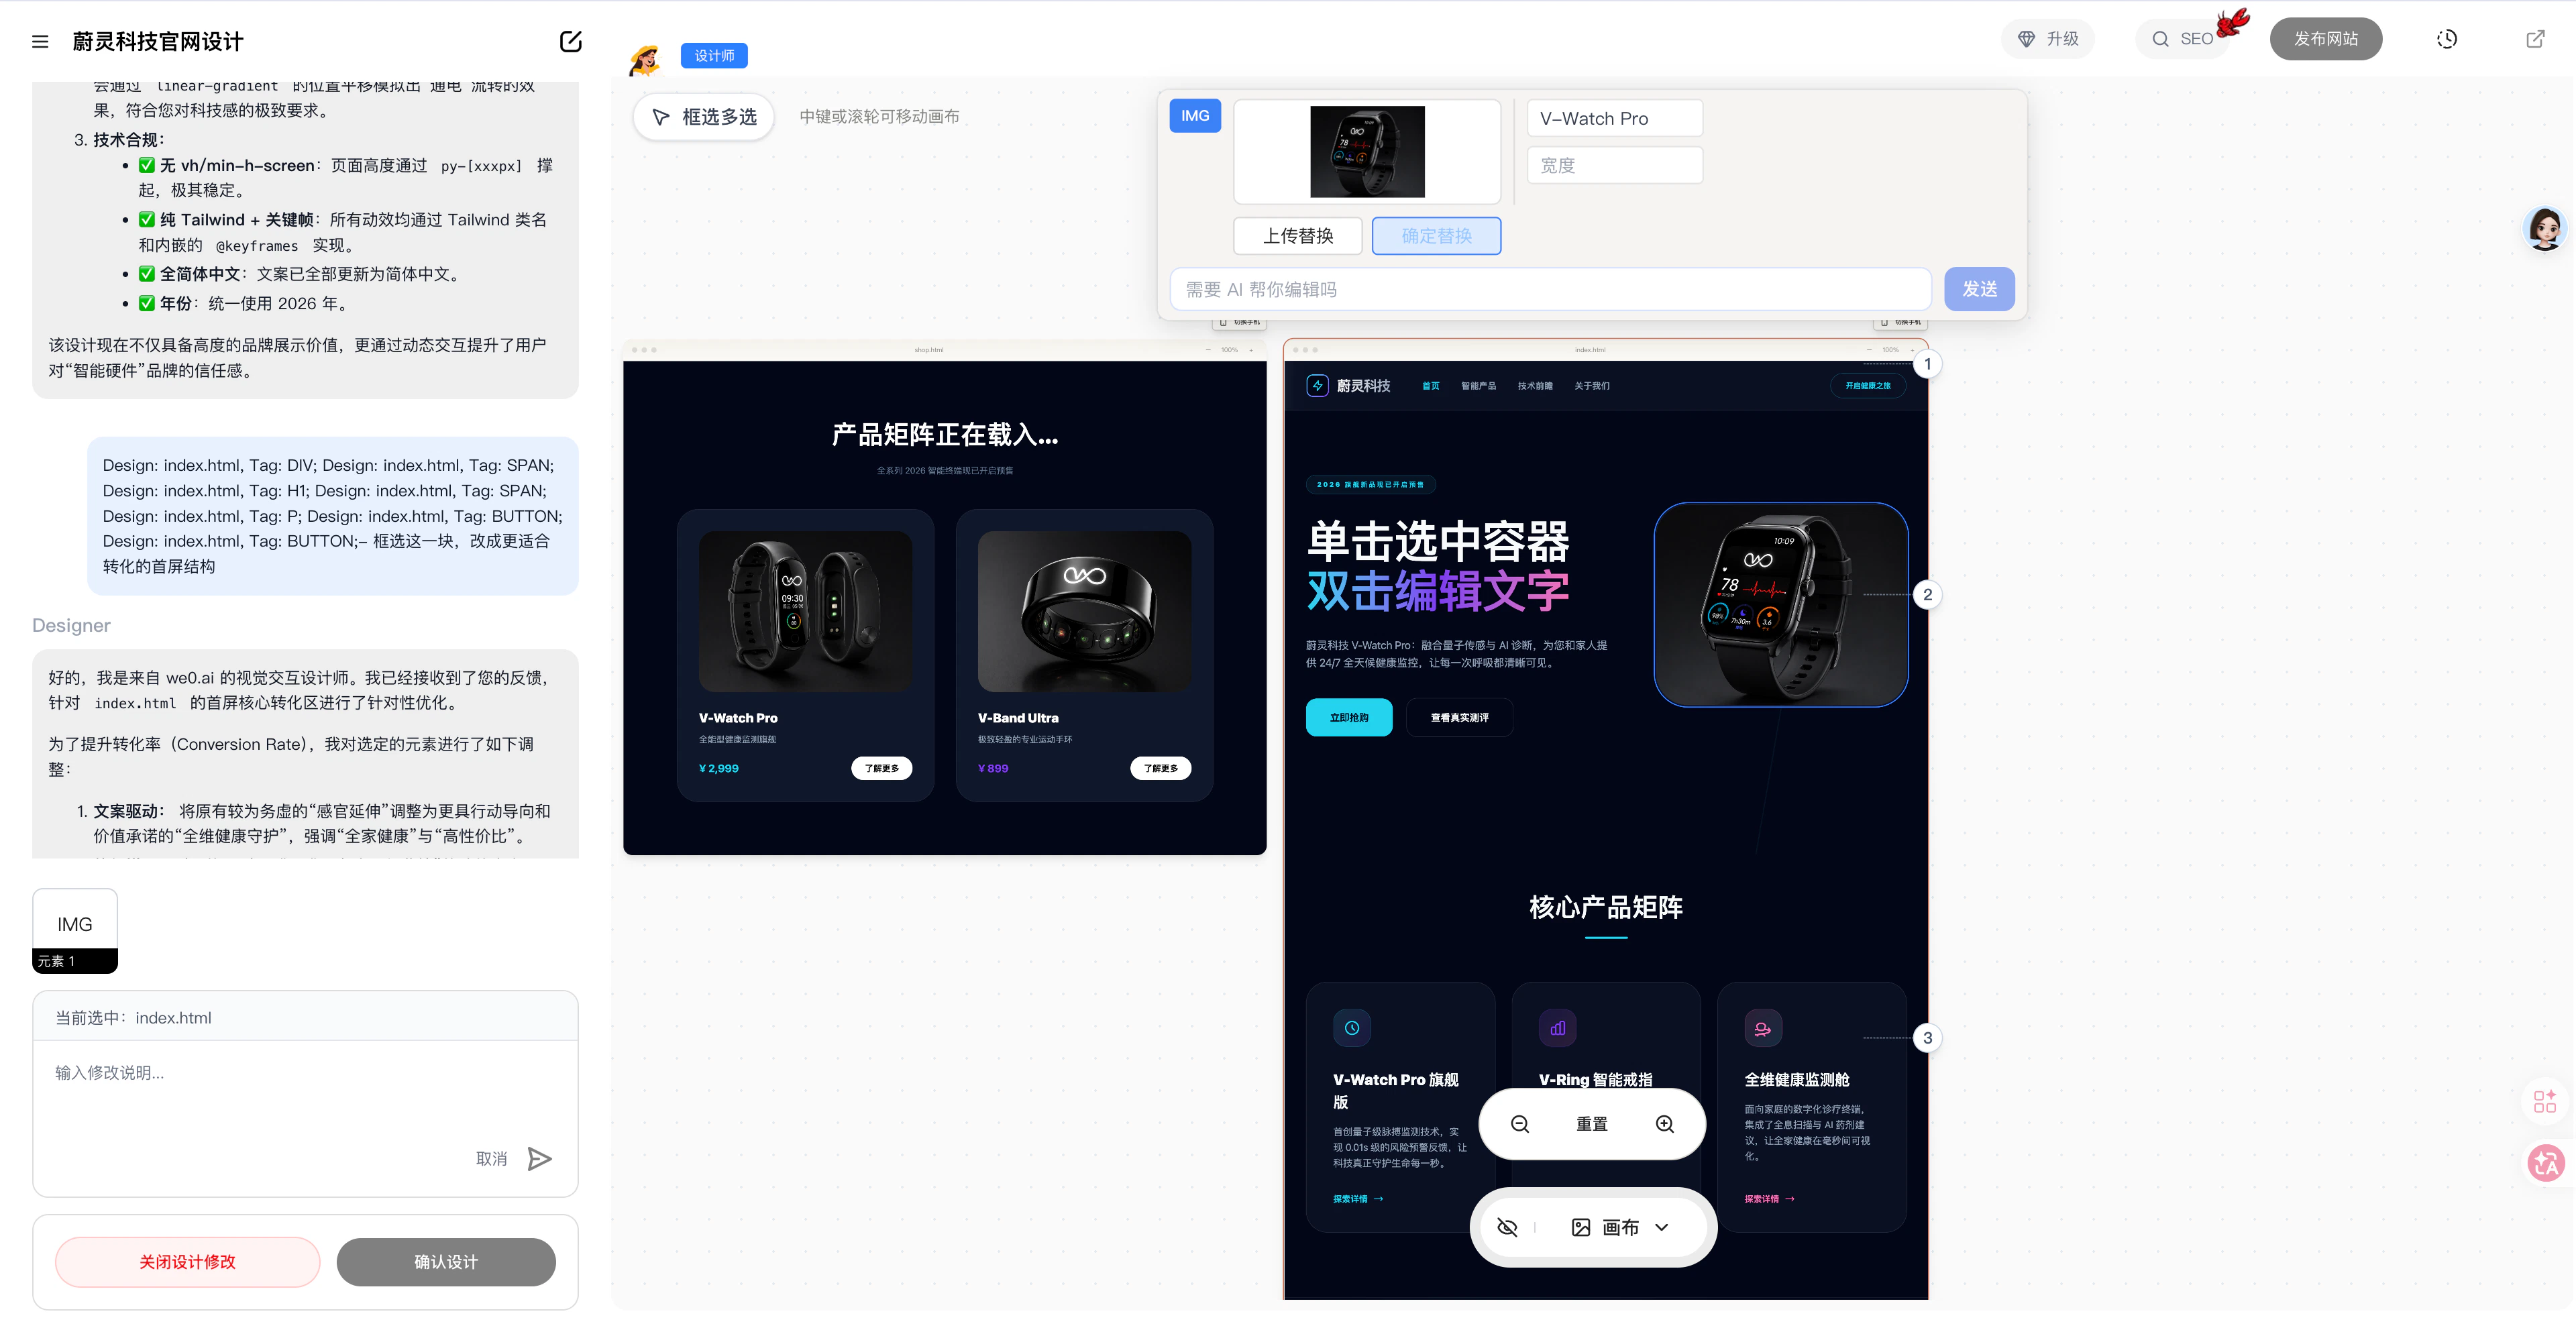
#### **4. Element-Select Editing (Select a container in canvas)**
Element-select editing is for finer-grained content changes — a text block, an image, a button, or a small widget.
Single-click to select the container; double-click to directly edit text.
Best used for:
* Editing a specific heading, subtitle, or body text
* Adjusting button copy
* Modifying a number, label, or descriptor
* Fine-tuning a specific image or small element's position and expression
Examples:
* Replace the AI-generated case image with your own product photo
* Change this button text from "Learn More" to "Book a Demo Now"
When you only want to change one specific point without affecting the surrounding content, use element-select editing first.
***
#### **4. Element-Select Editing (Select a container in canvas)**
Element-select editing is for finer-grained content changes — a text block, an image, a button, or a small widget.
Single-click to select the container; double-click to directly edit text.
Best used for:
* Editing a specific heading, subtitle, or body text
* Adjusting button copy
* Modifying a number, label, or descriptor
* Fine-tuning a specific image or small element's position and expression
Examples:
* Replace the AI-generated case image with your own product photo
* Change this button text from "Learn More" to "Book a Demo Now"
When you only want to change one specific point without affecting the surrounding content, use element-select editing first.
 ***
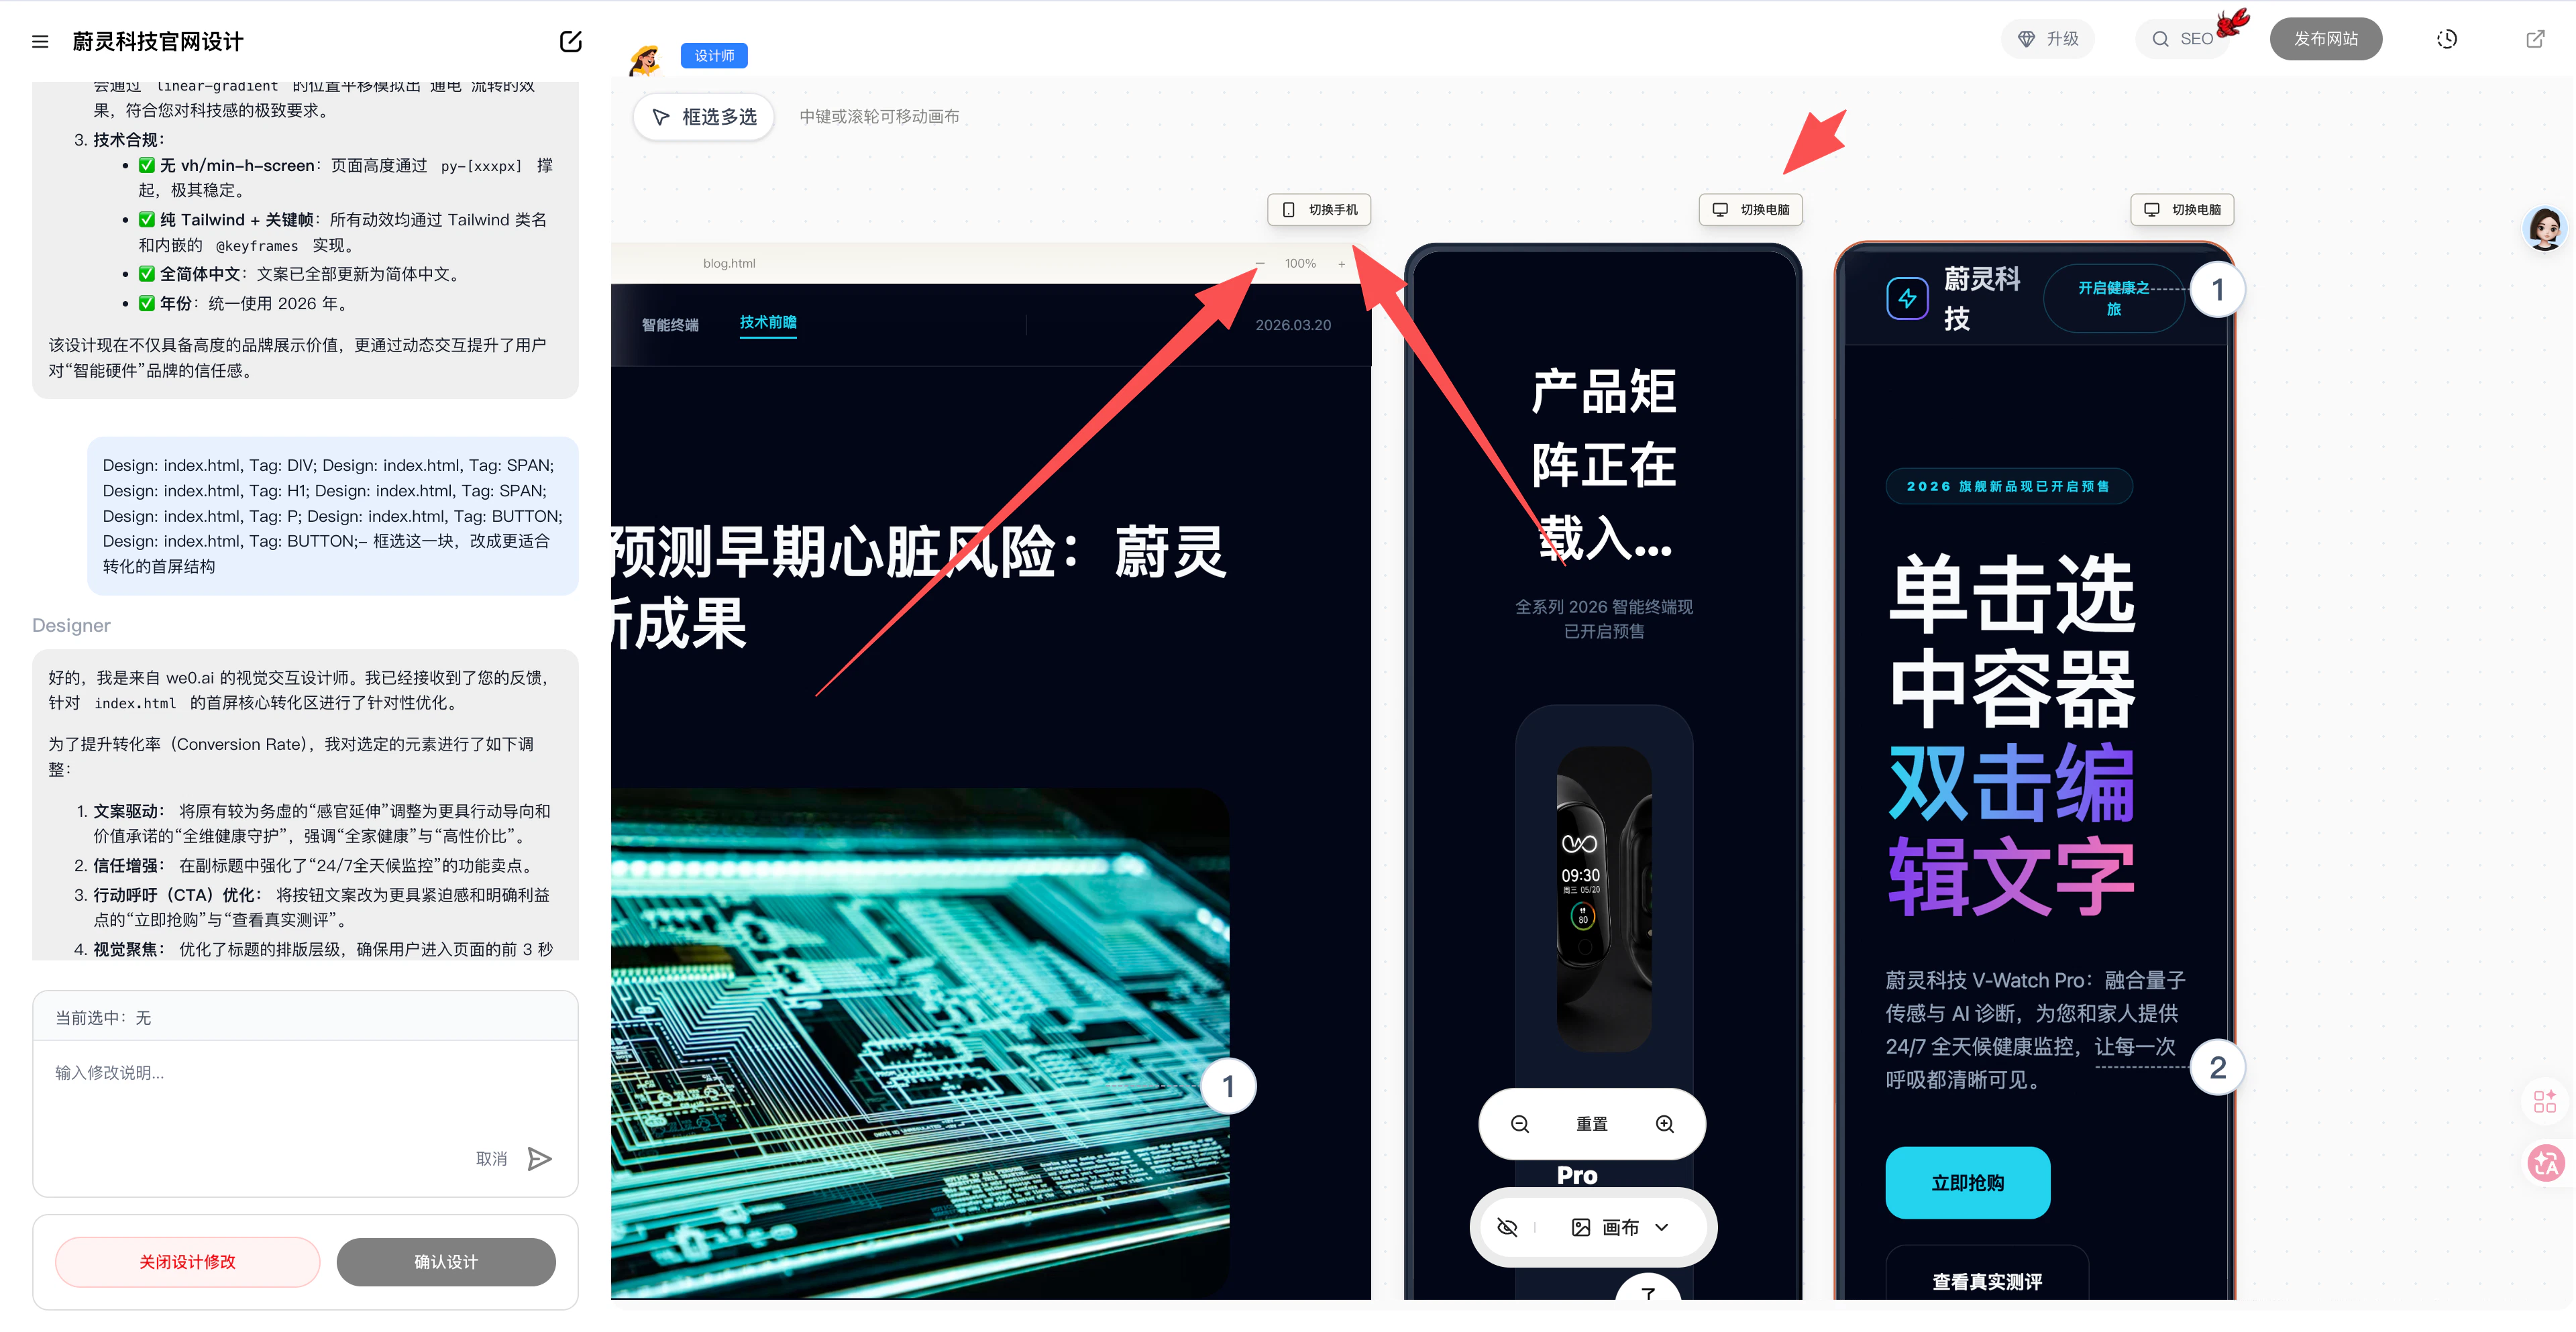
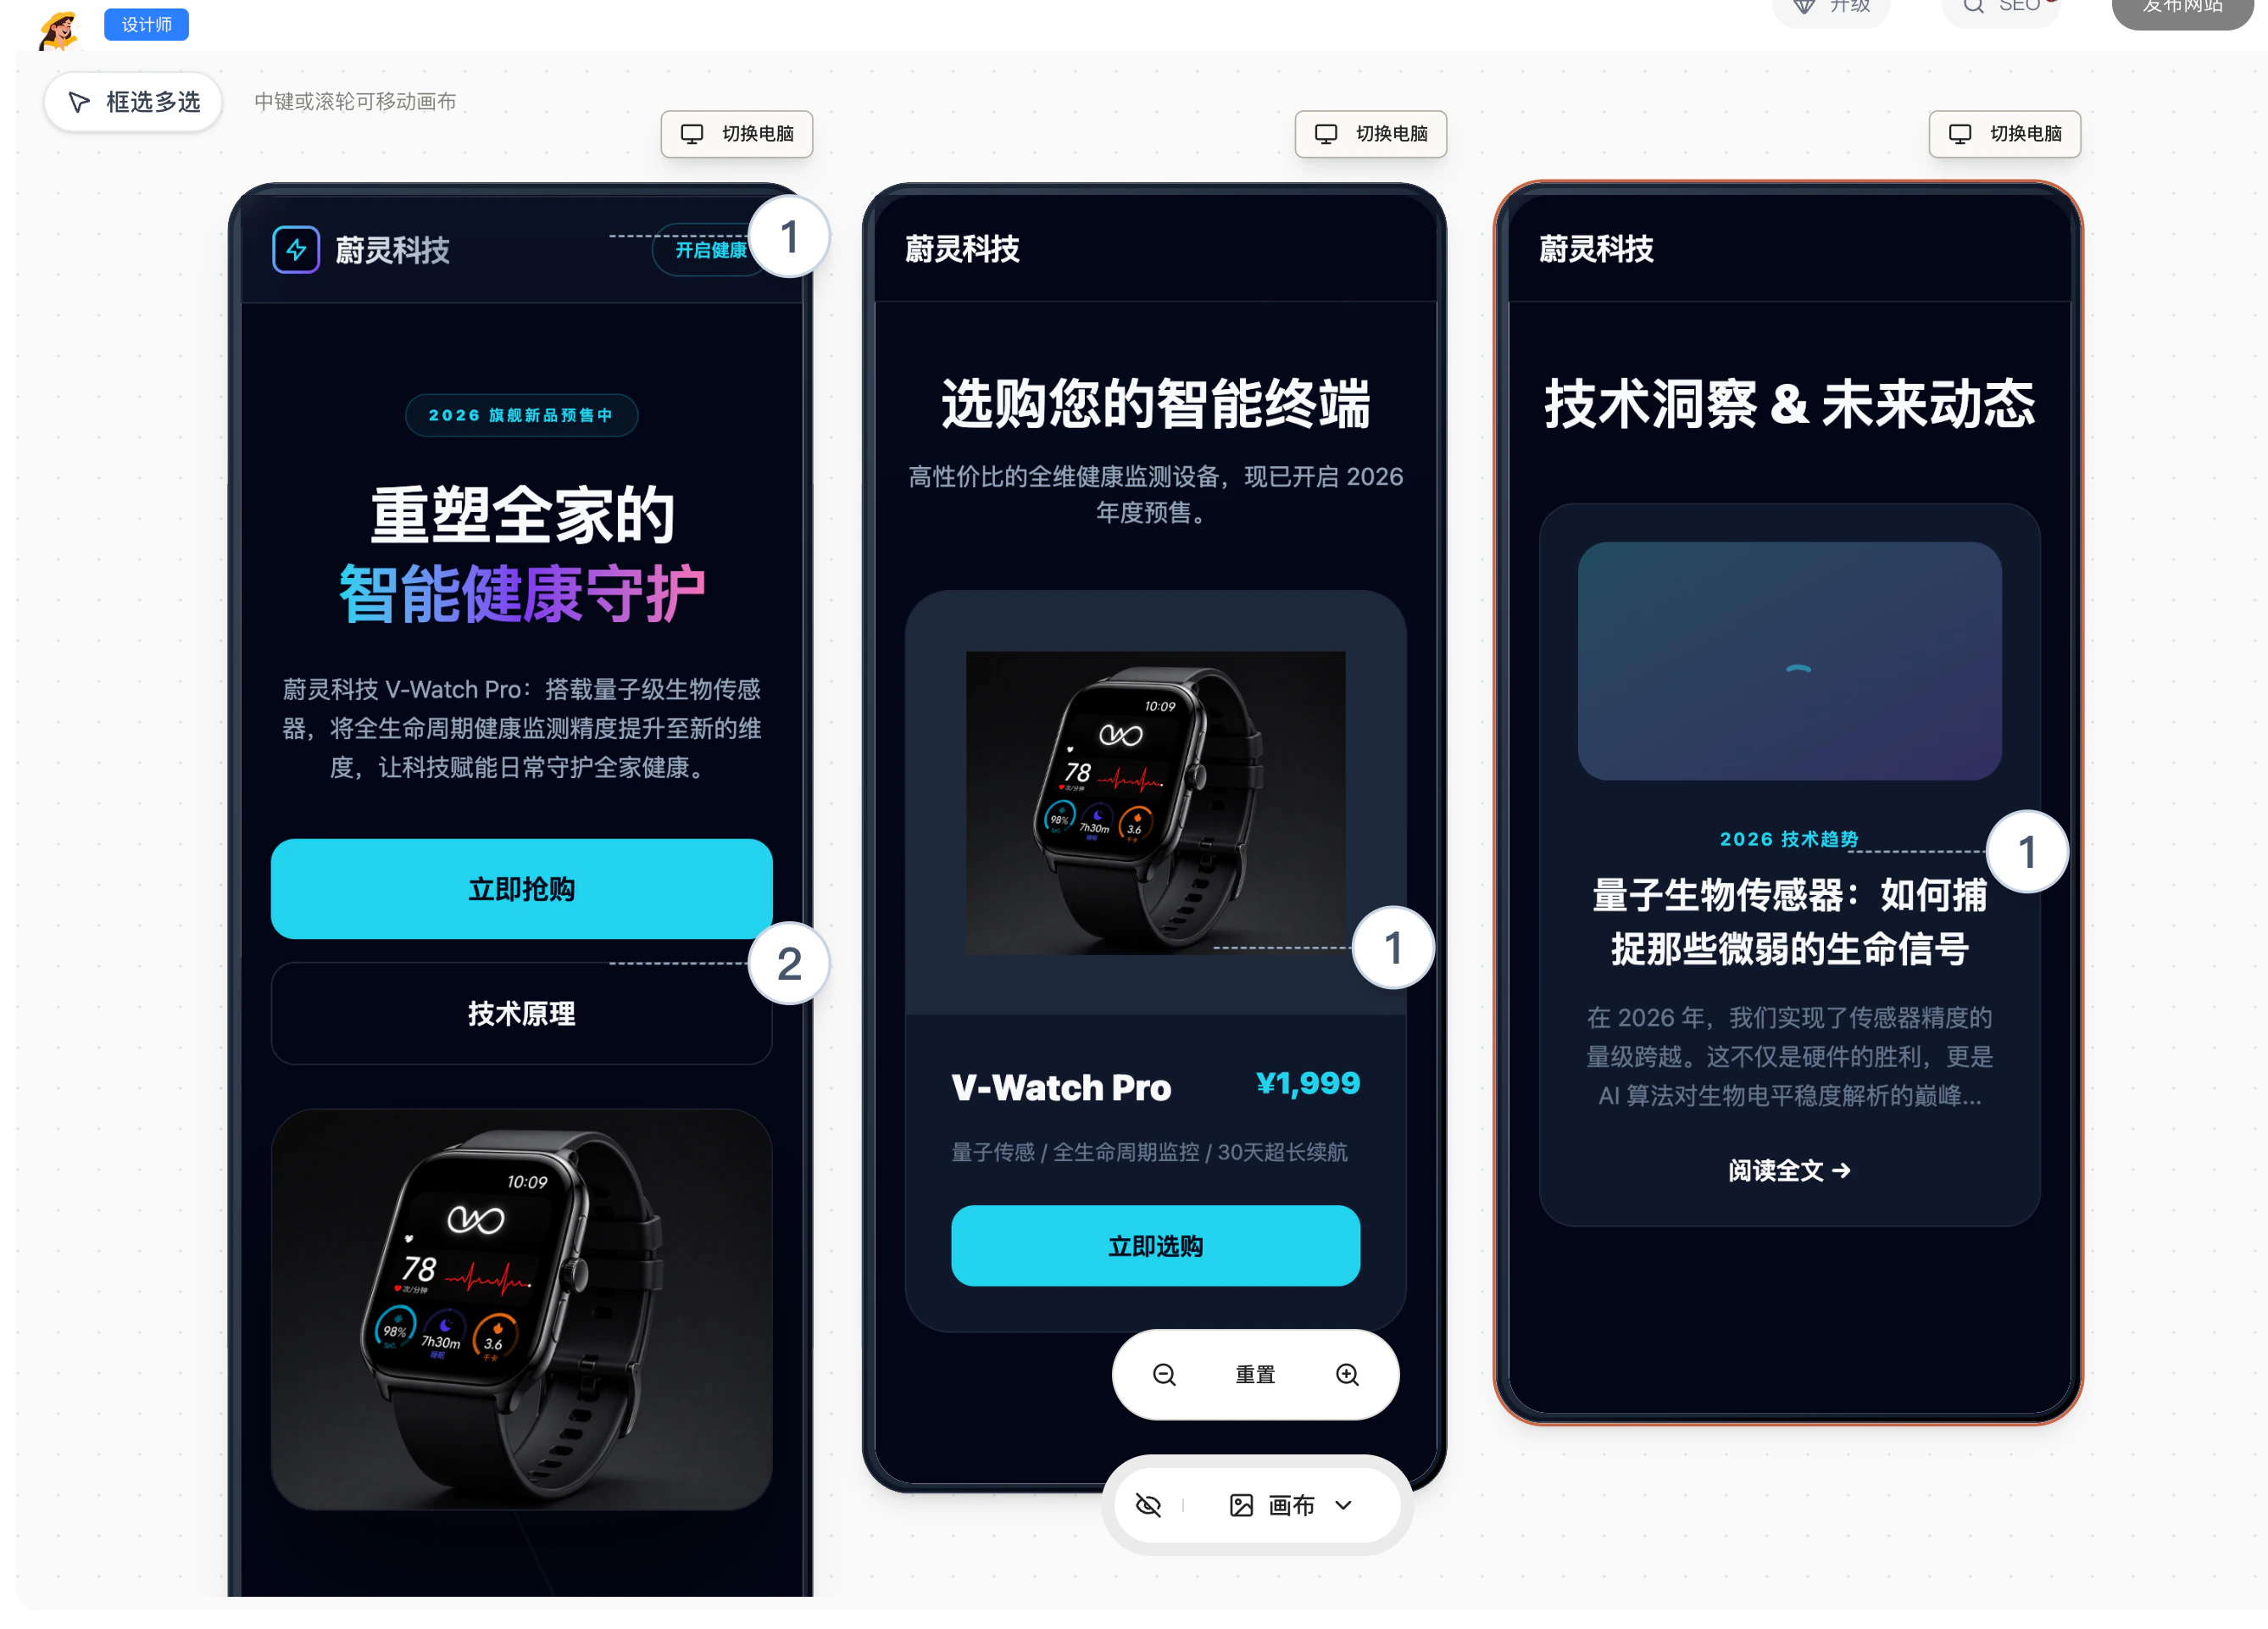
#### **5. Mobile Preview (Click the mobile toggle in canvas)**
Many websites look fine on desktop but show obvious issues on mobile — text too long, images too large, buttons too cramped, or broken layouts.
We recommend switching to mobile view to check pages during the canvas stage.
Key things to check:
* Are titles too long?
* Are paragraphs too dense?
* Are images being cropped?
* Are buttons easy to tap?
* Is the spacing between modules comfortable?
* Are forms and contact info clearly visible?
If you find issues, tell the AI:
* Add mobile responsiveness for all pages
Mobile isn't something to add at the end — we recommend perfecting it during the canvas stage.
***
#### **5. Mobile Preview (Click the mobile toggle in canvas)**
Many websites look fine on desktop but show obvious issues on mobile — text too long, images too large, buttons too cramped, or broken layouts.
We recommend switching to mobile view to check pages during the canvas stage.
Key things to check:
* Are titles too long?
* Are paragraphs too dense?
* Are images being cropped?
* Are buttons easy to tap?
* Is the spacing between modules comfortable?
* Are forms and contact info clearly visible?
If you find issues, tell the AI:
* Add mobile responsiveness for all pages
Mobile isn't something to add at the end — we recommend perfecting it during the canvas stage.
 ***
### **B. Preview Stage**
The preview stage is closest to the final live state. At this stage, put yourself in the shoes of a real visitor and continue refining the website from the perspective of "can they understand it, can they use it, can they convert."
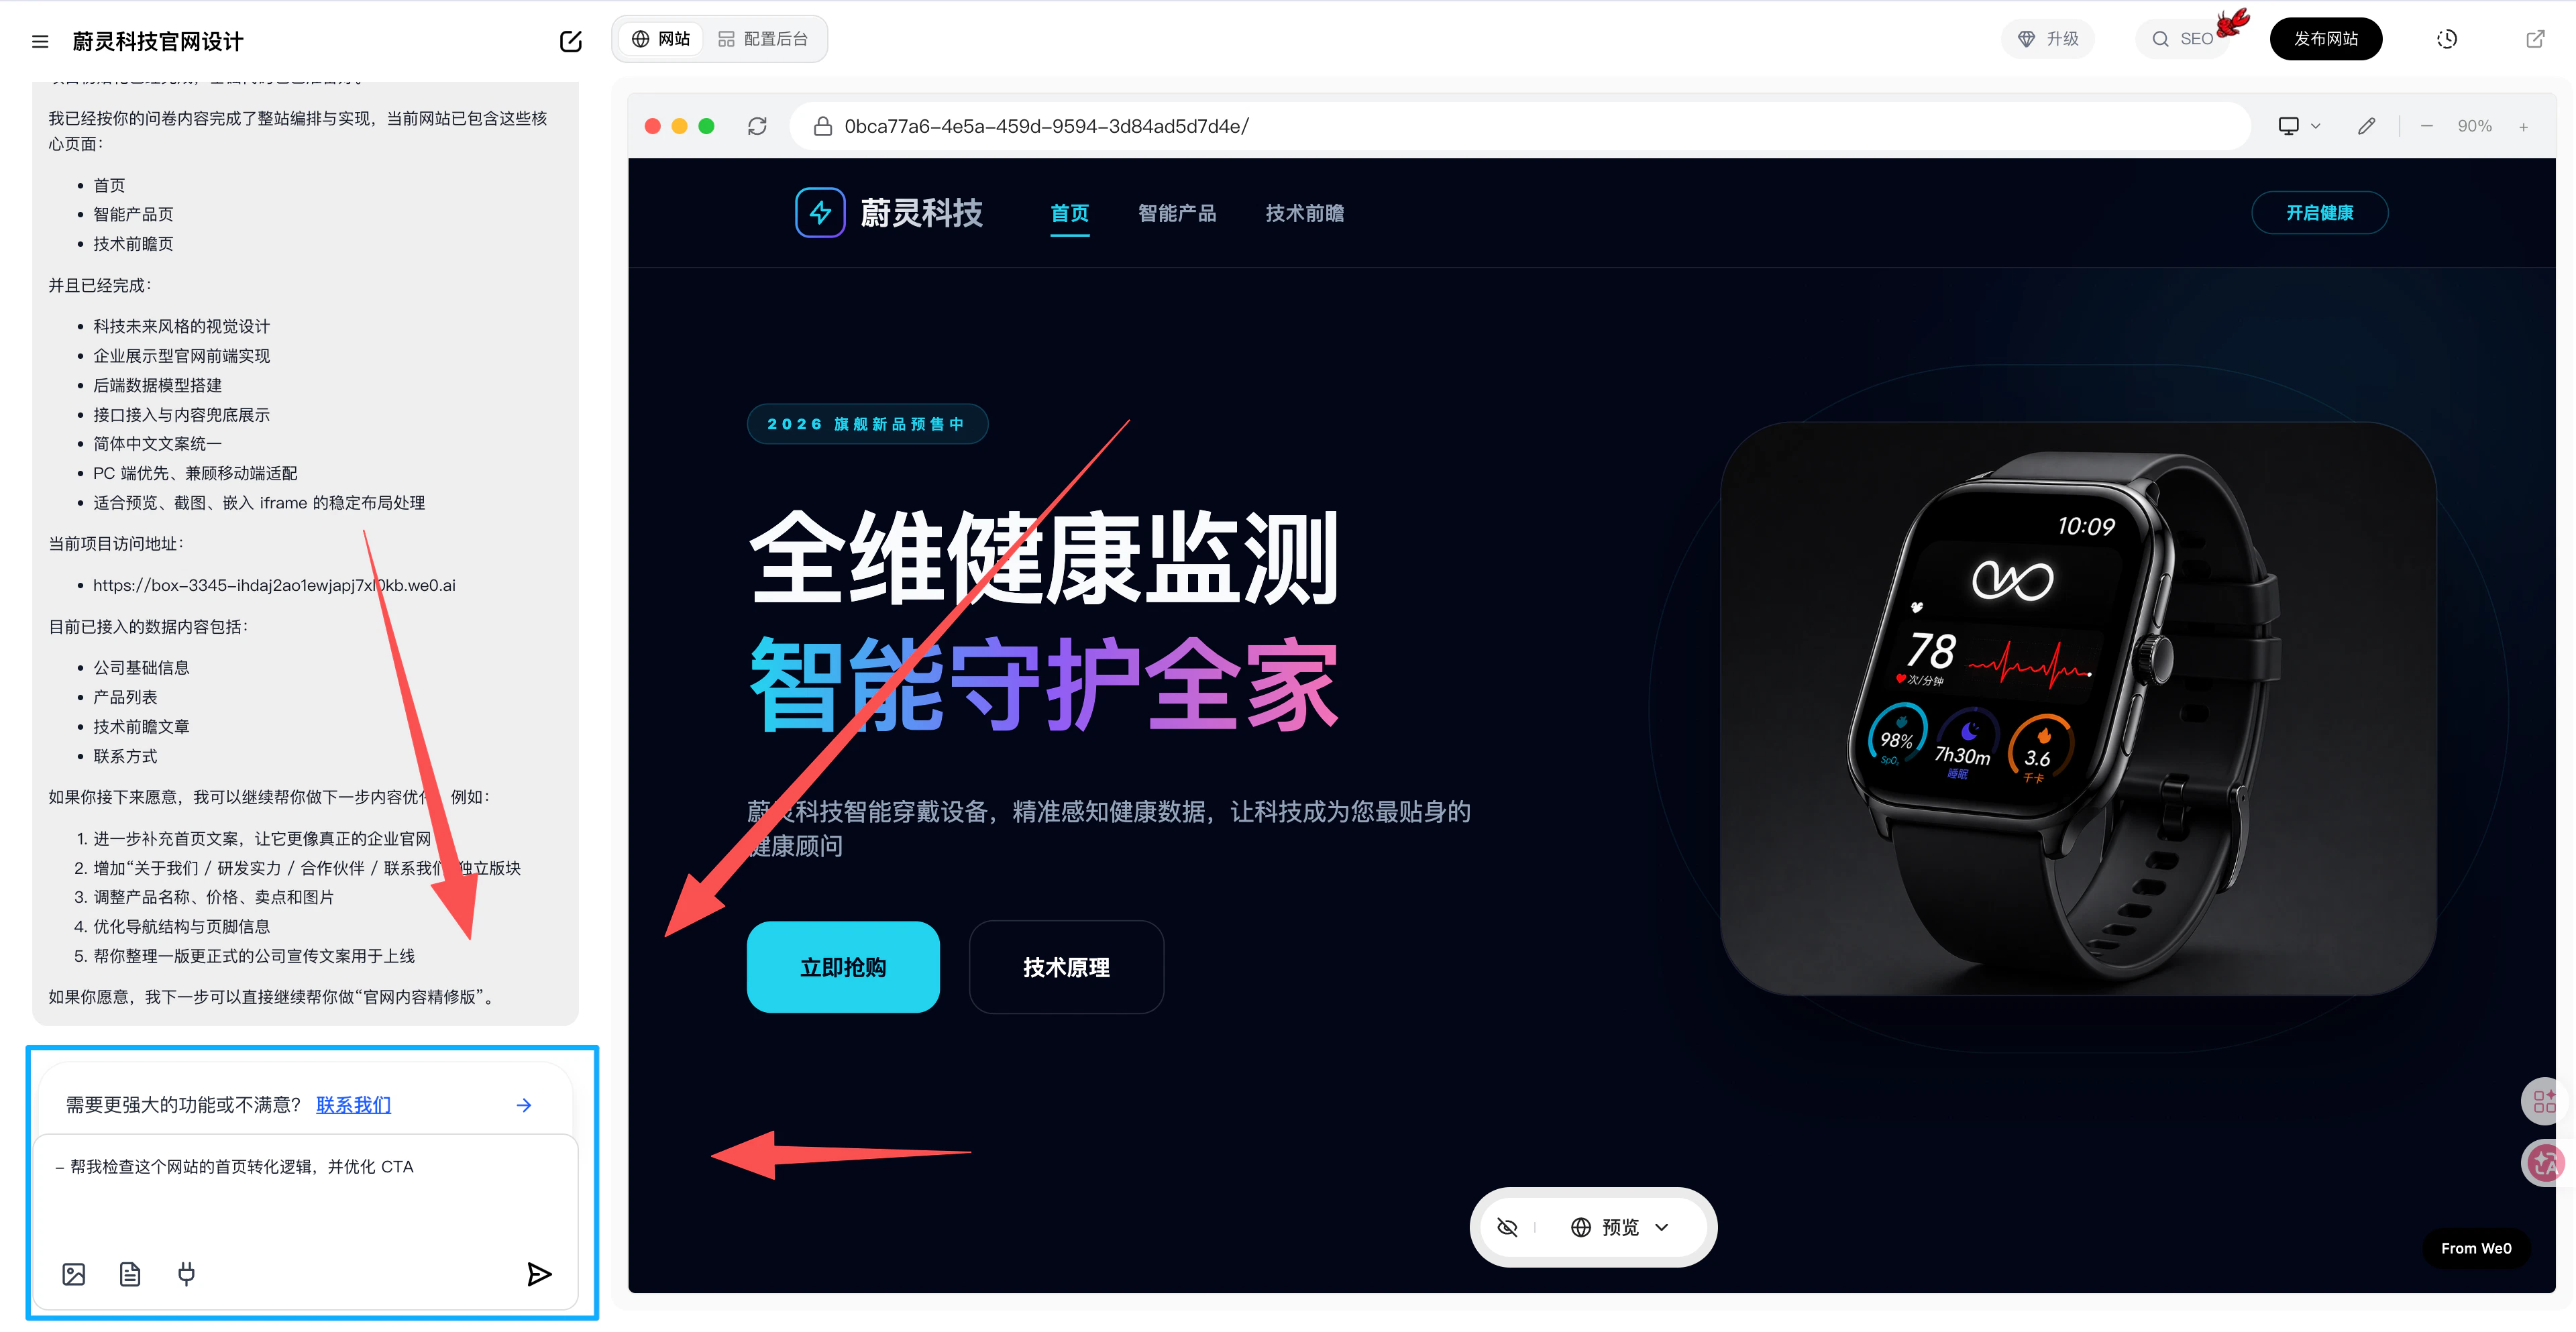
#### **1. Dialog Editing**
In the preview stage, dialog editing is better suited for "experience-level" issues, not just visual tweaks.
Examples:
* The homepage looks good, but the selling points aren't clear enough
* Contact info is there, but the conversion entry isn't obvious enough
* Some pages have incomplete content
* The user browsing path isn't smooth enough
You can say:
* Check this website's homepage conversion logic and optimize the CTA
* Unify the copy across these pages to a more professional brand voice
* Fill in the missing content on this page
The focus at this stage isn't "adding more content" — it's making the website more complete, smoother, and closer to a usable final state.
***
### **B. Preview Stage**
The preview stage is closest to the final live state. At this stage, put yourself in the shoes of a real visitor and continue refining the website from the perspective of "can they understand it, can they use it, can they convert."
#### **1. Dialog Editing**
In the preview stage, dialog editing is better suited for "experience-level" issues, not just visual tweaks.
Examples:
* The homepage looks good, but the selling points aren't clear enough
* Contact info is there, but the conversion entry isn't obvious enough
* Some pages have incomplete content
* The user browsing path isn't smooth enough
You can say:
* Check this website's homepage conversion logic and optimize the CTA
* Unify the copy across these pages to a more professional brand voice
* Fill in the missing content on this page
The focus at this stage isn't "adding more content" — it's making the website more complete, smoother, and closer to a usable final state.
 ***
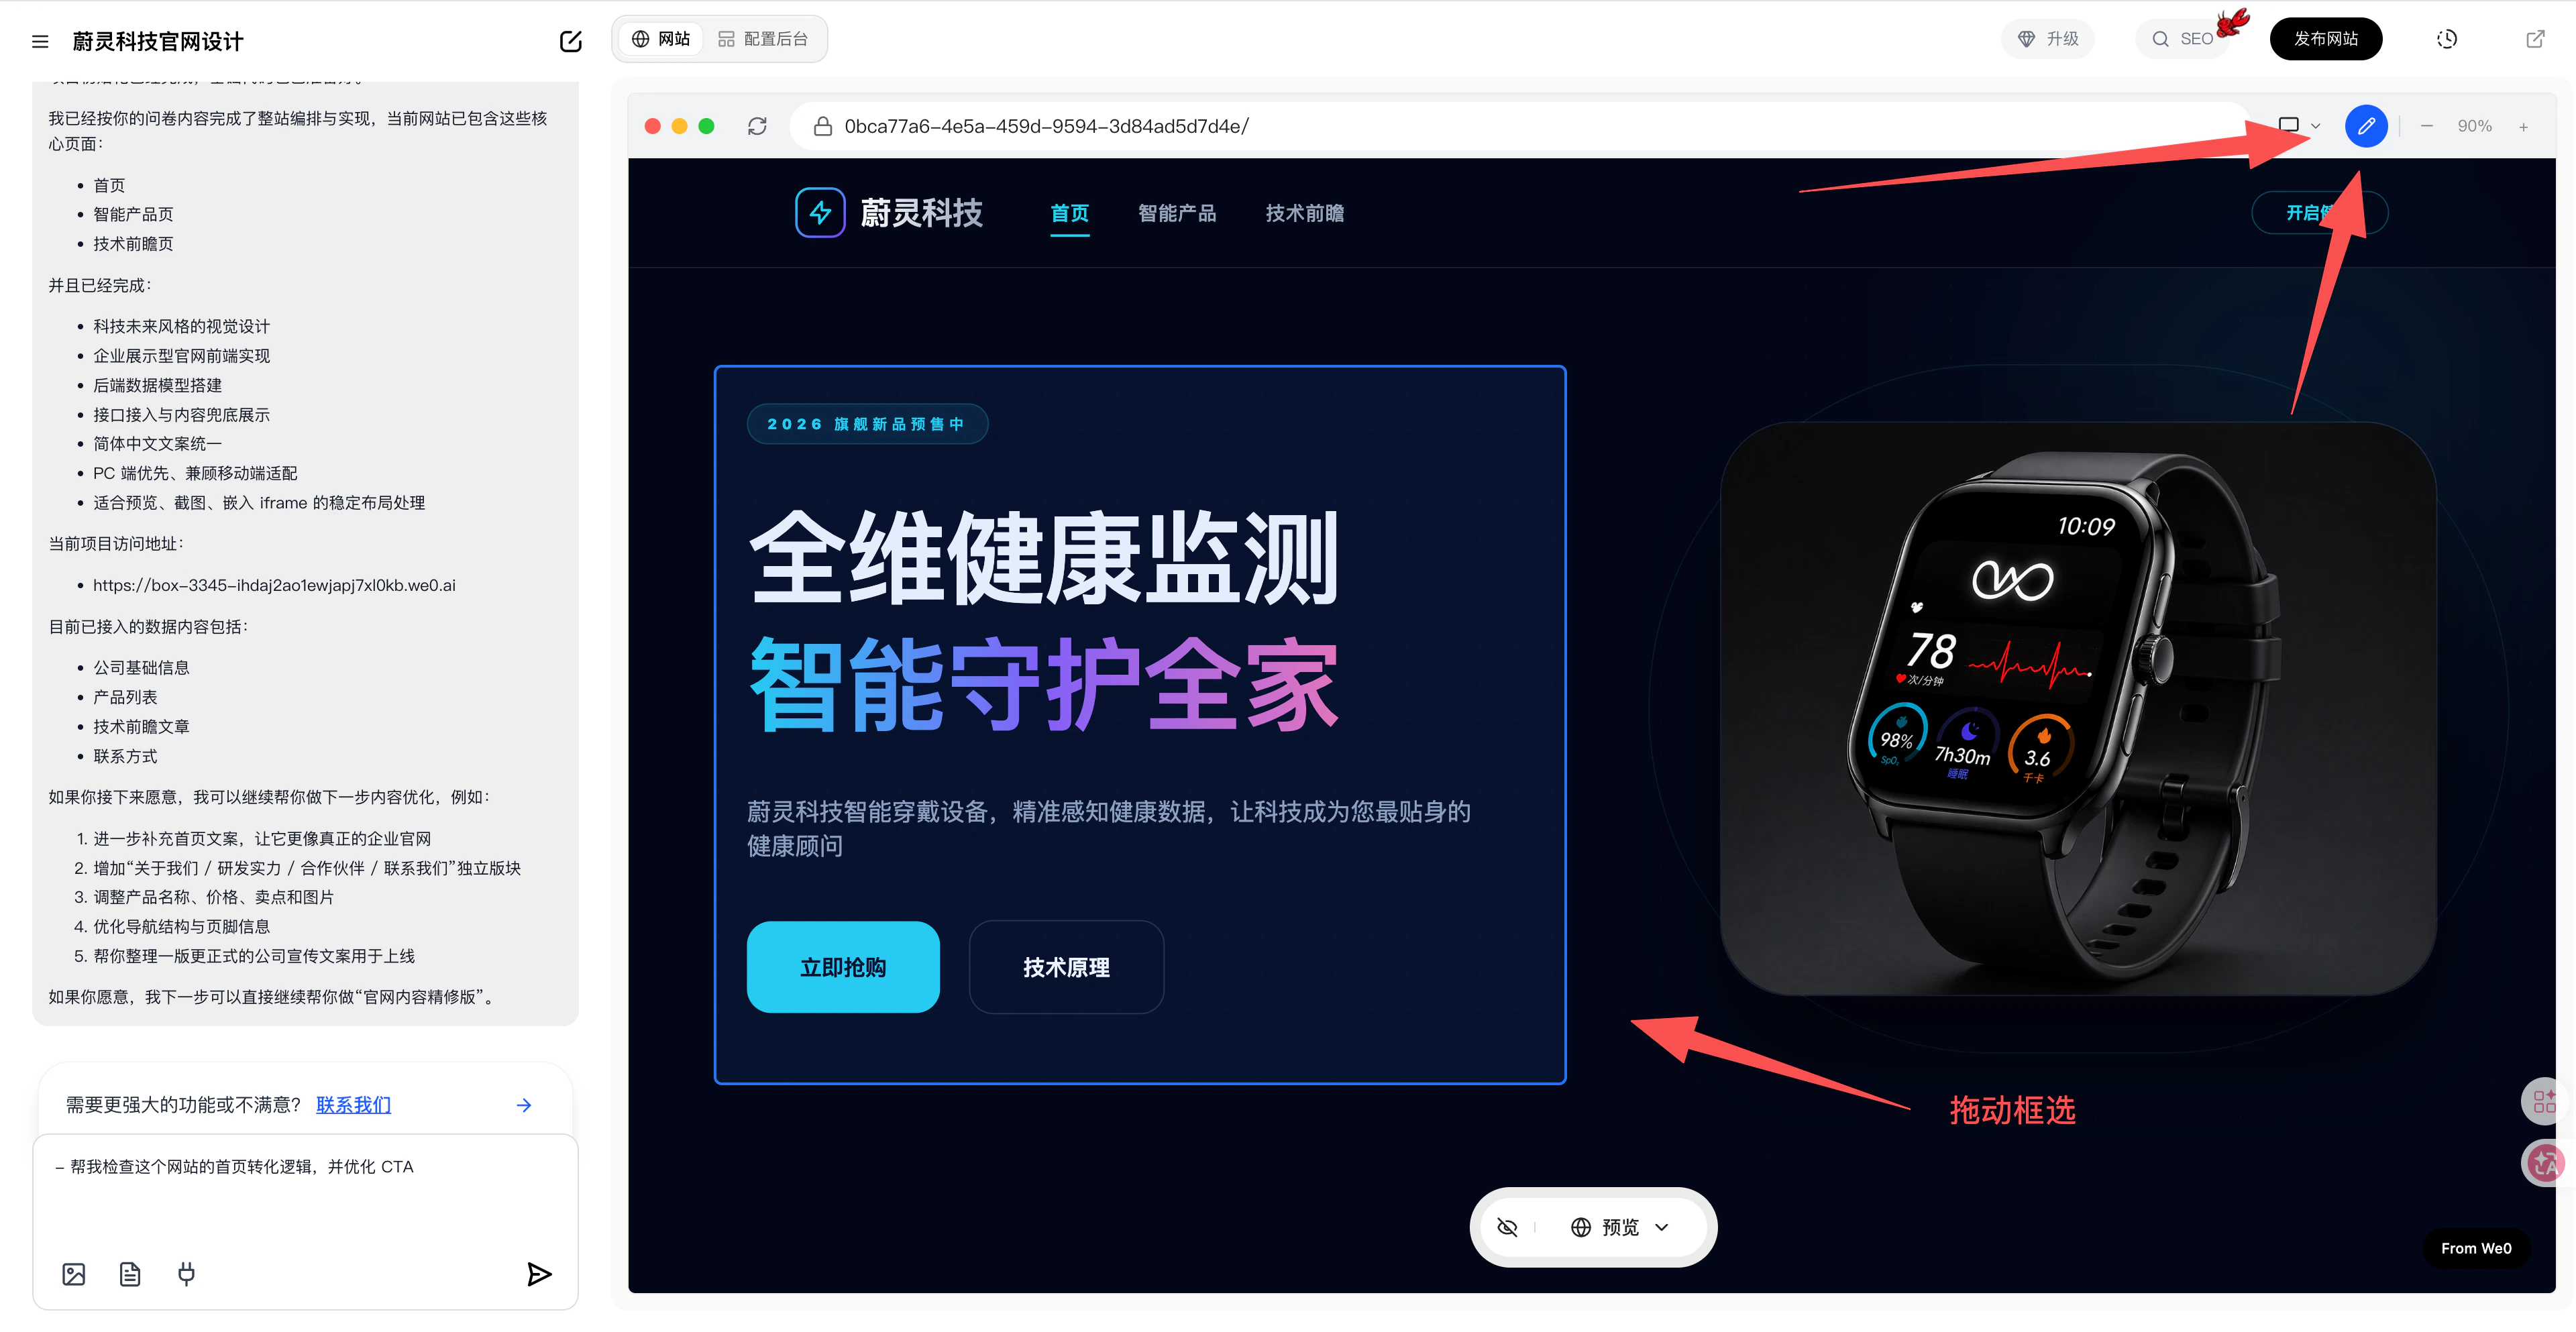
#### **2. Magic Brush**
The Magic Brush is best for quickly pointing out issues and making fast local fixes. You can mark a specific area on the page and let the AI understand exactly where you want changes.
Best suited for:
* A section that looks inconsistent
* An element in the wrong position
* A local area that needs a quick copy or style change
* Quickly fixing a batch of small issues before launch
Examples:
* Too much whitespace here — tighten it up
* This button isn't prominent enough — make it stand out more
* This image doesn't match the copy — replace it
If you already know exactly where the problem is on the page, the Magic Brush is usually more efficient than re-describing the entire page.
***
#### **2. Magic Brush**
The Magic Brush is best for quickly pointing out issues and making fast local fixes. You can mark a specific area on the page and let the AI understand exactly where you want changes.
Best suited for:
* A section that looks inconsistent
* An element in the wrong position
* A local area that needs a quick copy or style change
* Quickly fixing a batch of small issues before launch
Examples:
* Too much whitespace here — tighten it up
* This button isn't prominent enough — make it stand out more
* This image doesn't match the copy — replace it
If you already know exactly where the problem is on the page, the Magic Brush is usually more efficient than re-describing the entire page.
 ***
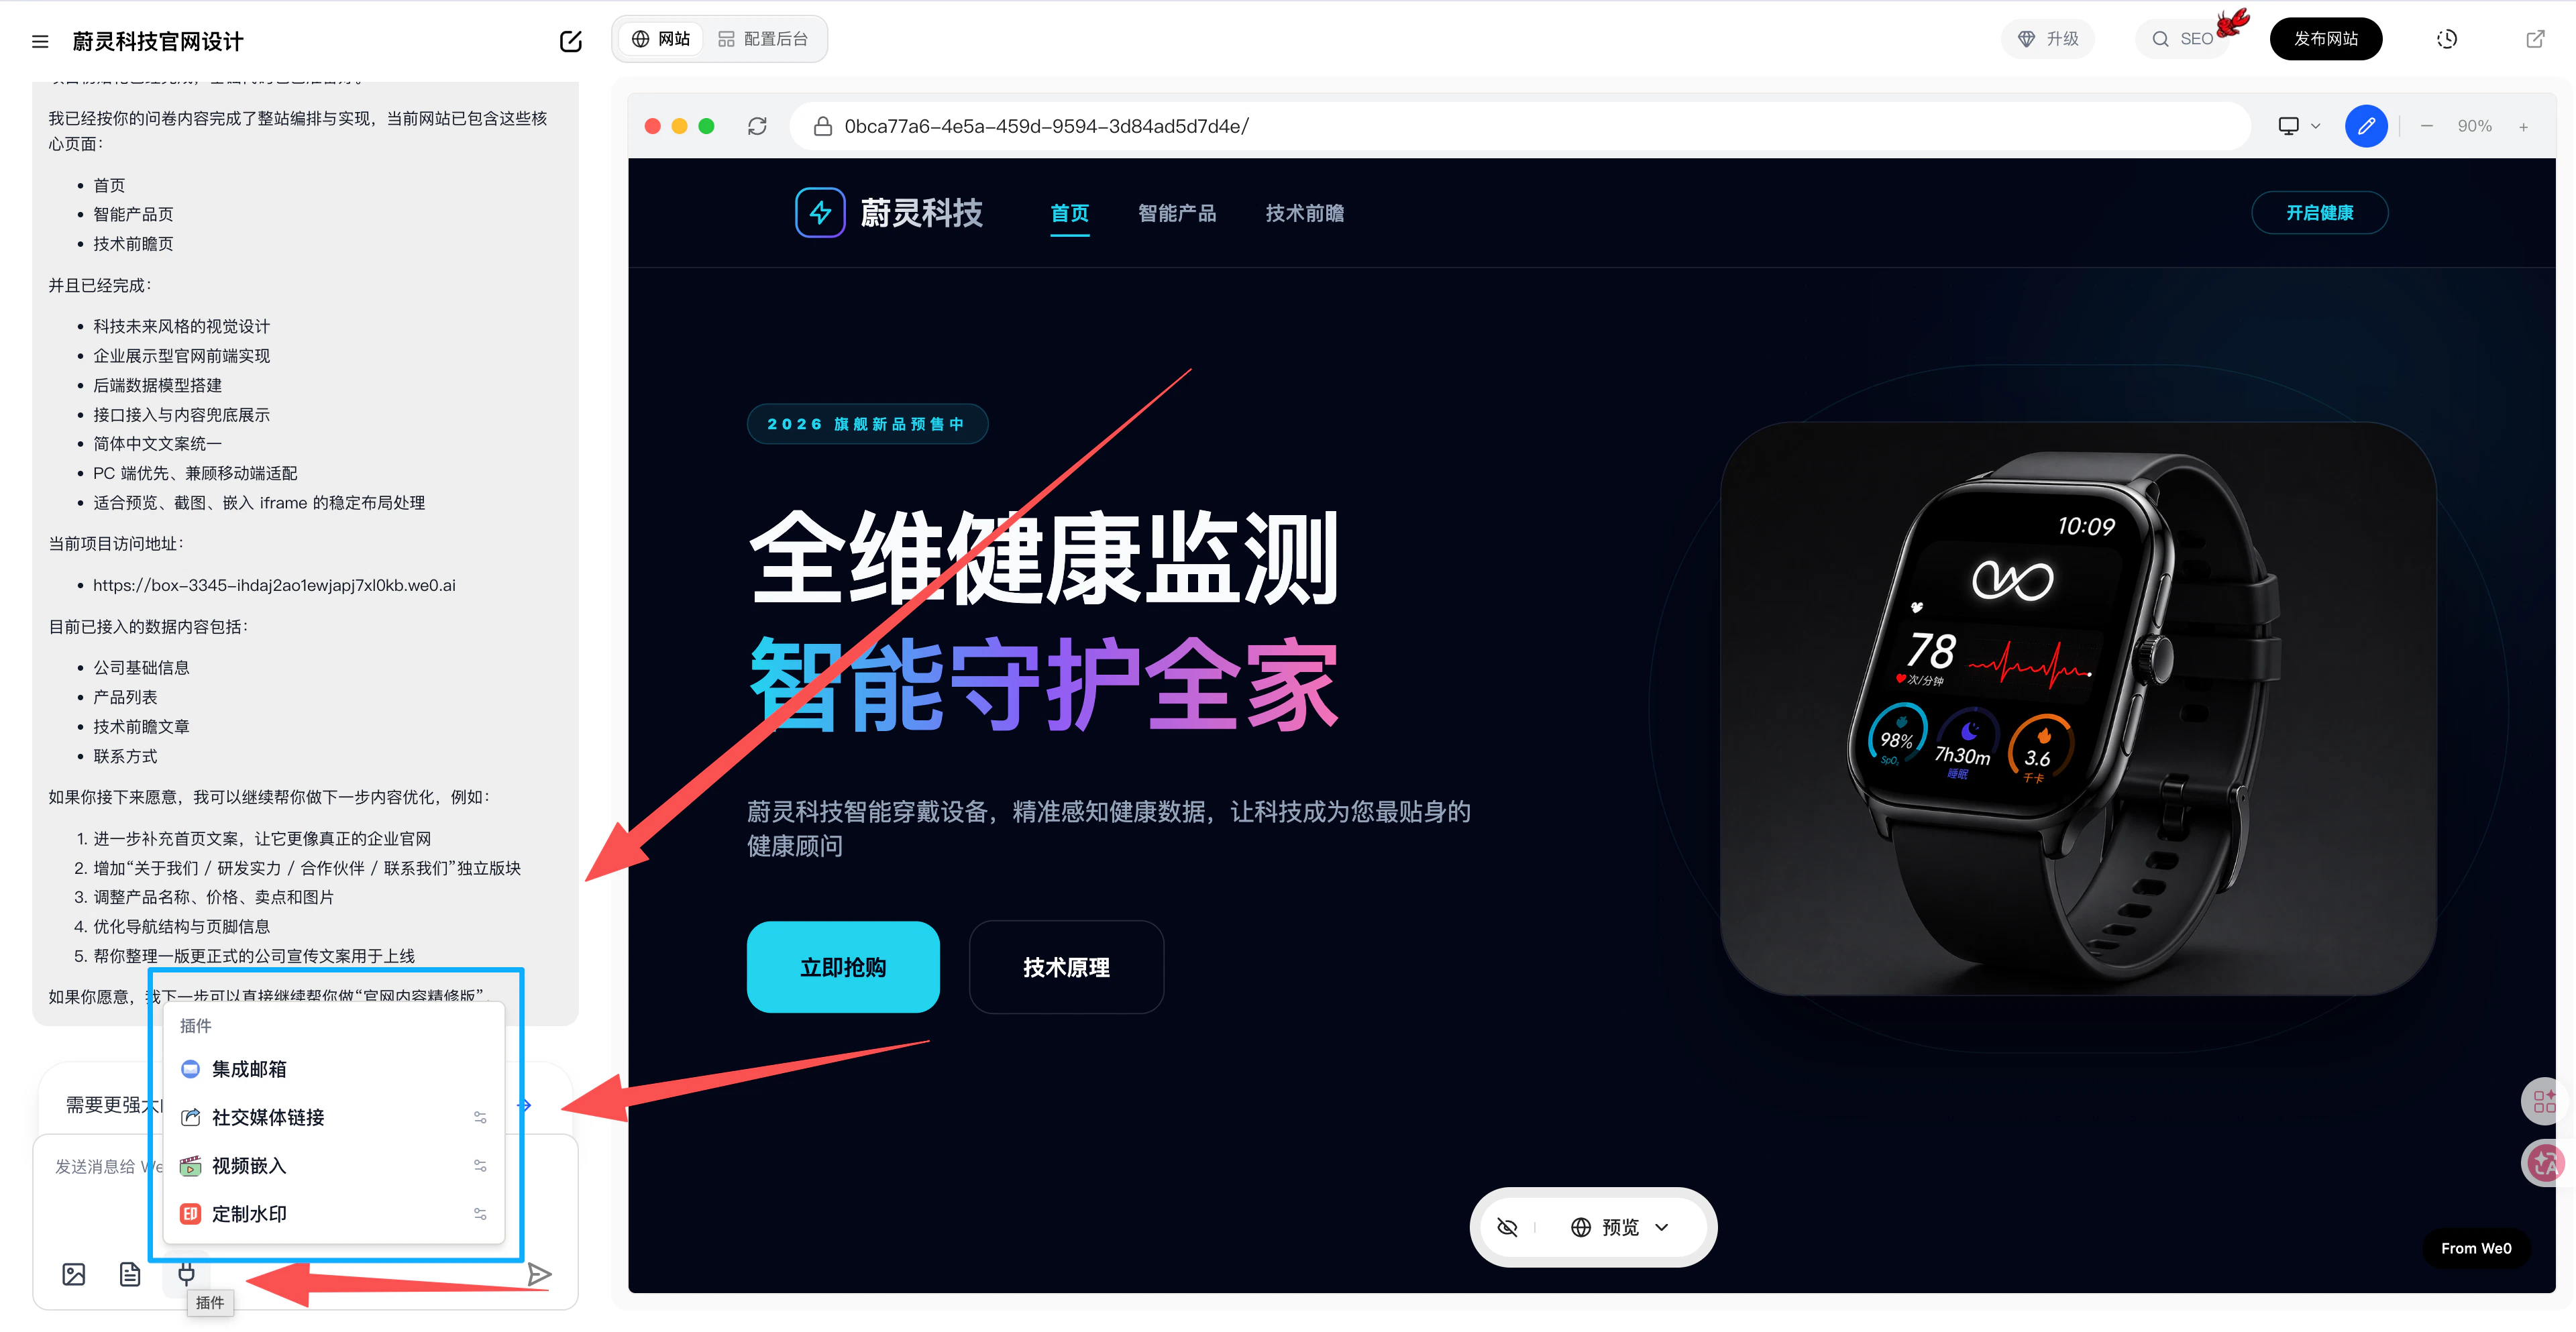
#### **3. Plugin Extensions**
Once the main website is essentially complete, you can use plugin extensions during the preview stage to enhance capabilities.
* Email integration
* Social media links
* Video embedding
* Custom watermarks
We recommend finalizing core pages, copy, and conversion paths first, then considering plugin extensions — this approach is more stable.
***
#### **3. Plugin Extensions**
Once the main website is essentially complete, you can use plugin extensions during the preview stage to enhance capabilities.
* Email integration
* Social media links
* Video embedding
* Custom watermarks
We recommend finalizing core pages, copy, and conversion paths first, then considering plugin extensions — this approach is more stable.
 ***
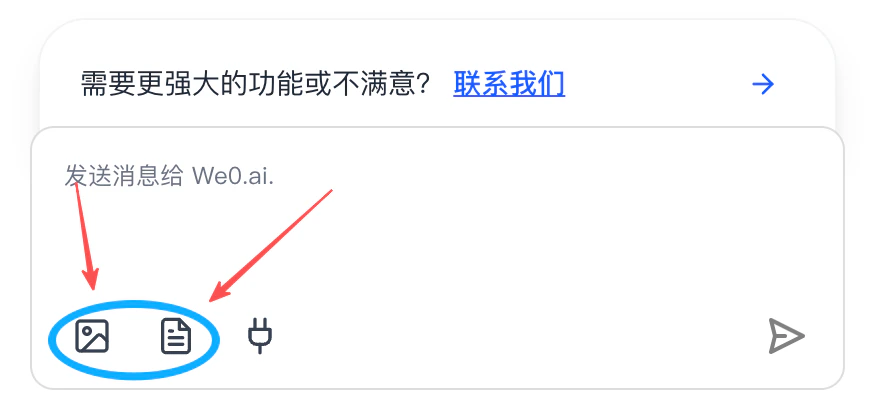
#### **4. Images & Documents**
During the preview stage, images and documents are often the key factors that determine a website's "authenticity" and "completeness."
You can continue to add or replace:
* Brand logo
* Product images
* Team photos
* Scenario images
* Posters or promotional graphics
* Company introduction documents
* Product manuals
* Marketing materials
The value of this content:
* Makes the website more than an empty shell
* Makes brand expression more authentic and credible
* Gives the AI more reference material for future optimization
* Helps users understand your business faster
Pre-launch checklist:
* Are images clear and copyright-cleared?
* Are documents the latest version?
* Are brand materials consistent?
* Are contact info, company name, and product names consistent throughout?
***
#### **4. Images & Documents**
During the preview stage, images and documents are often the key factors that determine a website's "authenticity" and "completeness."
You can continue to add or replace:
* Brand logo
* Product images
* Team photos
* Scenario images
* Posters or promotional graphics
* Company introduction documents
* Product manuals
* Marketing materials
The value of this content:
* Makes the website more than an empty shell
* Makes brand expression more authentic and credible
* Gives the AI more reference material for future optimization
* Helps users understand your business faster
Pre-launch checklist:
* Are images clear and copyright-cleared?
* Are documents the latest version?
* Are brand materials consistent?
* Are contact info, company name, and product names consistent throughout?
 ***
### **C. Practical Tips for Website Editing**
* Edit structure first, then copy, then details — don't start by obsessing over small styling tweaks
* Ensure the homepage, core pages, and conversion entry points are clear before enriching secondary pages
* Include goals with each edit request, such as "more professional," "better for conversion," or "more suitable for overseas audiences"
* For local issues, use section editing, box-select editing, or Magic Brush — you don't always need to redo the entire page
* Check mobile view after every round of edits to avoid last-minute rework
* Before launch, browse through the homepage, key inner pages, form pages, and contact page at least once
***
***
### **C. Practical Tips for Website Editing**
* Edit structure first, then copy, then details — don't start by obsessing over small styling tweaks
* Ensure the homepage, core pages, and conversion entry points are clear before enriching secondary pages
* Include goals with each edit request, such as "more professional," "better for conversion," or "more suitable for overseas audiences"
* For local issues, use section editing, box-select editing, or Magic Brush — you don't always need to redo the entire page
* Check mobile view after every round of edits to avoid last-minute rework
* Before launch, browse through the homepage, key inner pages, form pages, and contact page at least once
***